本文最后更新于:4 个月前
破冰
🔥 AOP:
🍖 JSON 与 Java 对象之间的转换:
Spring高手之路14——深入浅出:SPI机制在JDK与Spring Boot中的应用_java spi-CSDN博客
思维碰撞
SpringBoot AOP
什么是 AOP?
🍖 AOP(Aspect-Oriented Programming):面向切面编程,是一种编程范式,允许开发者在不修改源代码的情况下,在方法调用前后添加代码,提高代码的可重用性和灵活性,实现 “无侵入式编程”。(2023/10/25晚)
🥣 推荐阅读:
AOP 的组成
切面(Aspect)
切点(Pointcut)
通知(Advice)
连接点(Join Point)
小试牛刀
- 简单介绍完相关概念后,如果还有疑惑,还是我们的风格:不说任何一句废话,通过代码直观体会 SpringBoot AOP 的使用方法
- 首先新建一个 SpringBoot 项目,导入 SpringBoot AOP 依赖坐标:(2023/10/25晚)
1
2
3
4
5
| <dependency>
<groupId>org.springframework.boot</groupId>
<artifactId>spring-boot-starter-aop</artifactId>
<version>3.0.4</version>
</dependency>
|
1
2
3
4
5
6
7
8
9
10
11
12
13
14
15
16
| @RequestMapping("/user")
@RestController
public class UserController {
@RequestMapping("/hi")
public String hi() {
System.out.println("执行 UserController 的 hi() 方法");
return "do user";
}
@RequestMapping("/hello")
public String hello() {
System.out.println("执行 UserController 的 hello() 方法");
throw new RuntimeException("报错啦!");
}
}
|

定义切面
1
2
3
4
5
6
7
8
9
10
11
12
13
14
15
16
17
18
19
20
21
22
23
24
25
26
|
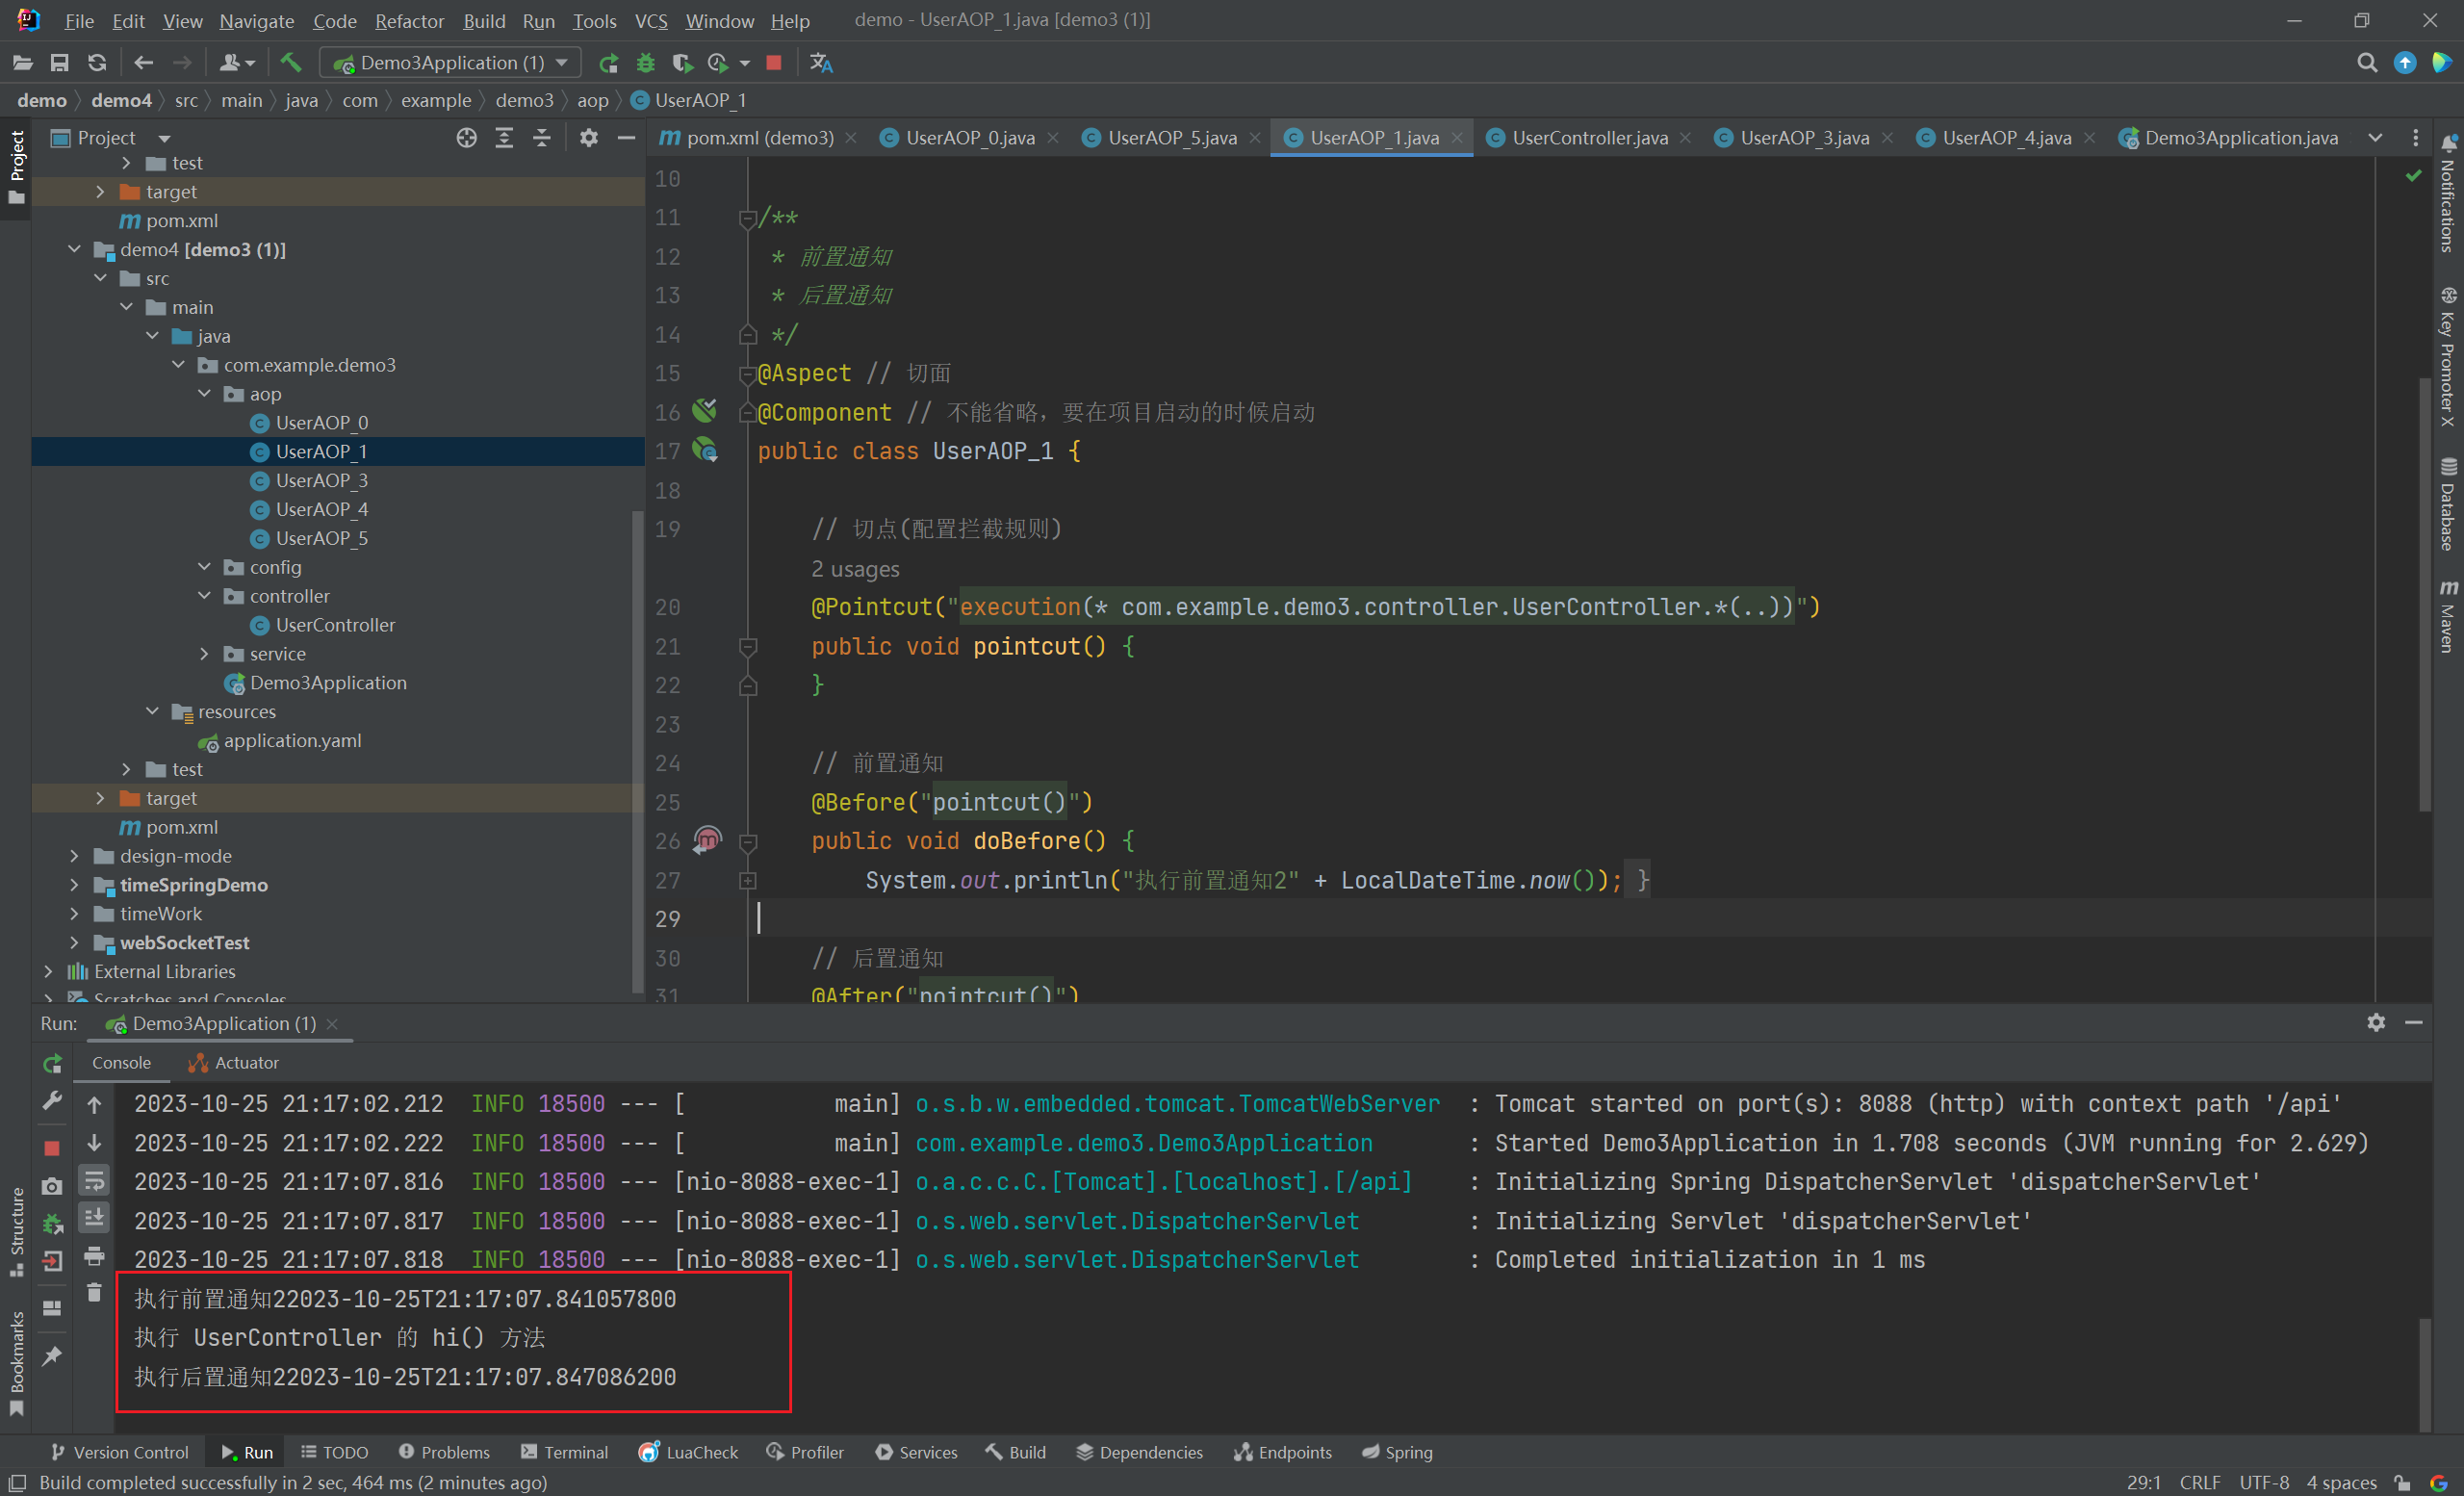
@Aspect
@Component
public class UserAOP_1 {
@Pointcut("execution(* com.example.demo3.controller.UserController.*(..))")
public void pointcut() {
}
@Before("pointcut()")
public void doBefore() {
System.out.println("执行前置通知2" + LocalDateTime.now());
}
@After("pointcut()")
public void doAfter() {
System.out.println("执行后置通知2" + LocalDateTime.now());
}
}
|
- 运行并访问:
http://localhost:8088/api/user/hi,结果如下:
1
2
3
4
5
6
7
8
9
10
11
12
13
14
15
16
17
18
19
20
21
22
23
24
|
@Aspect
@Component
public class UserAOP_3 {
@Pointcut("execution(* com.example.demo3.controller.UserController.*(..))")
public void pointcut() {
}
@Around("pointcut()")
public Object doAround(ProceedingJoinPoint joinPoint) throws Throwable {
System.out.println("开始执行环绕通知:");
Object obj = joinPoint.proceed();
System.out.println("结束环绕通知");
obj = "do Around " + obj;
System.out.println(obj);
return obj;
}
}
|
- 运行并访问:
http://localhost:8088/api/user/hi,结果如下:(2023/10/25晚)

1
2
3
4
5
6
7
8
9
10
11
12
13
14
15
16
17
18
19
20
21
22
23
24
25
26
27
28
29
30
31
32
33
34
35
36
37
38
39
|
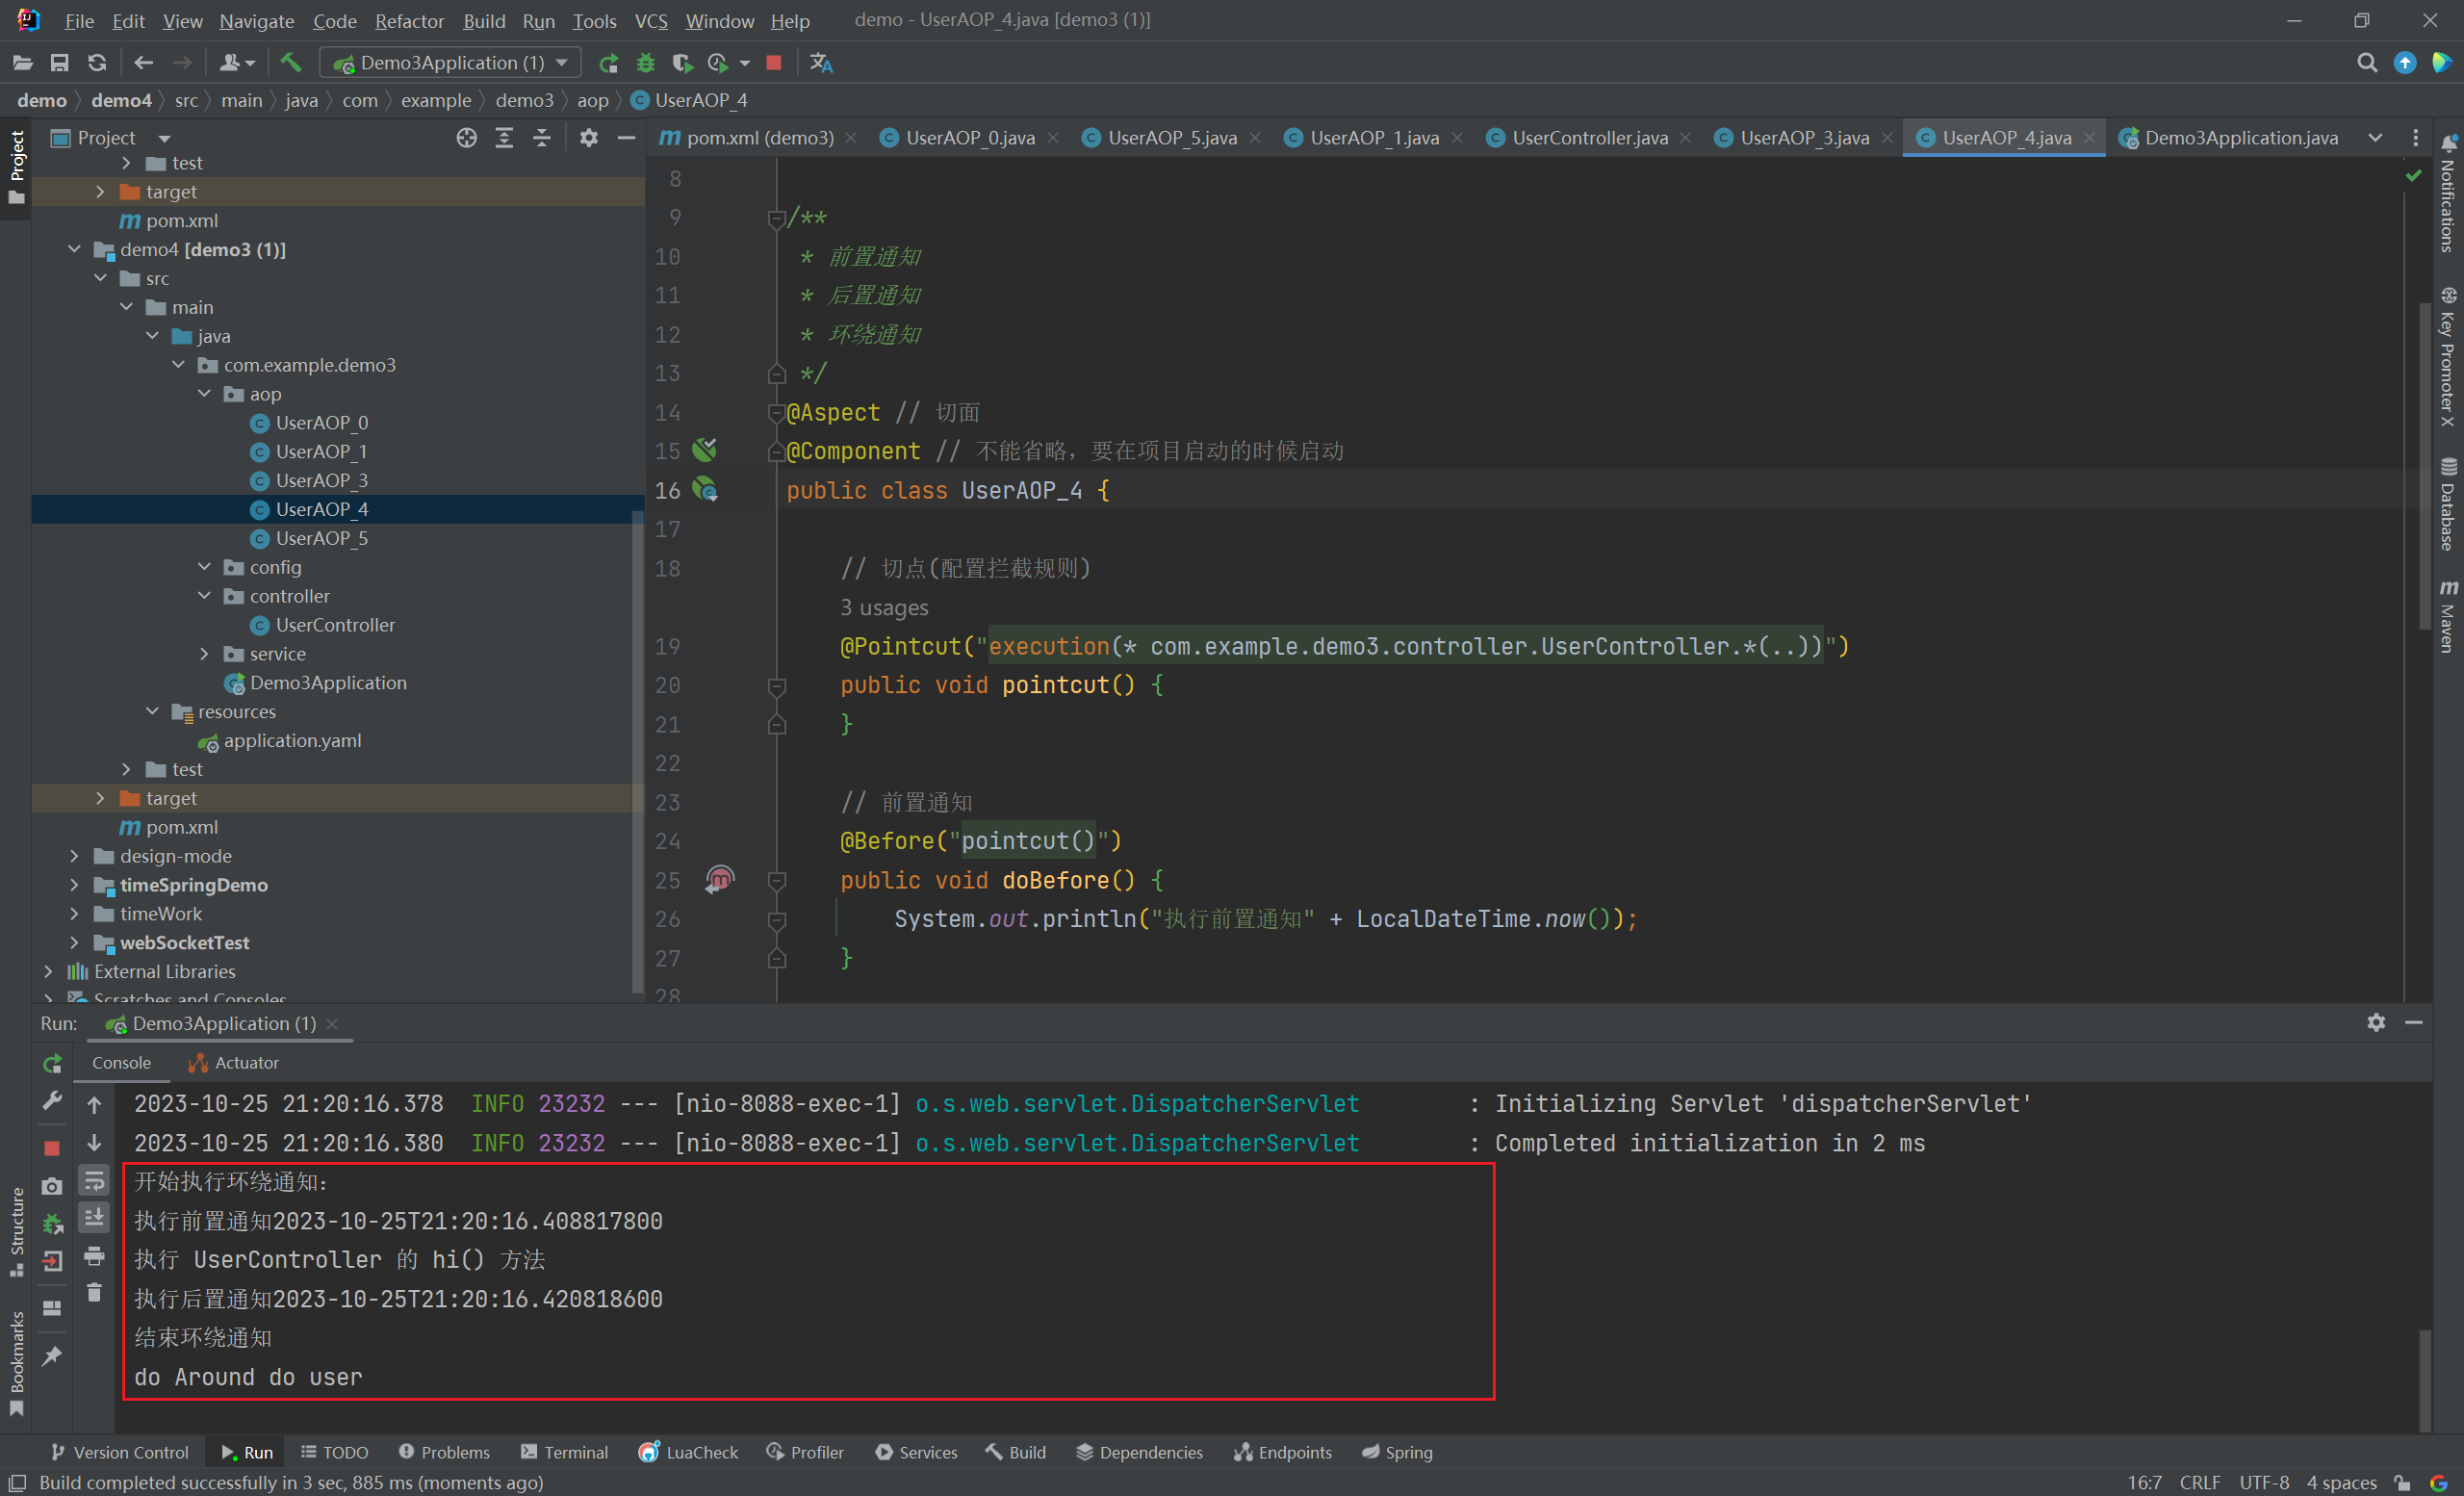
@Aspect
@Component
public class UserAOP_4 {
@Pointcut("execution(* com.example.demo3.controller.UserController.*(..))")
public void pointcut() {
}
@Before("pointcut()")
public void doBefore() {
System.out.println("执行前置通知" + LocalDateTime.now());
}
@After("pointcut()")
public void doAfter() {
System.out.println("执行后置通知" + LocalDateTime.now());
}
@Around("pointcut()")
public Object doAround(ProceedingJoinPoint joinPoint) throws Throwable {
System.out.println("开始执行环绕通知:");
Object obj = joinPoint.proceed();
System.out.println("结束环绕通知");
obj = "do Around " + obj;
System.out.println(obj);
return obj;
}
}
|
- 运行并访问:
http://localhost:8088/api/user/hi,结果如下:
1
2
3
4
5
6
7
8
9
10
11
12
13
14
15
16
17
18
|
@Aspect
@Component
public class UserAOP_0 {
@Pointcut(value = "execution(* com.example.demo3.controller.UserController.*(..))")
public void pointcut() {
}
@AfterReturning("pointcut()")
public void AfterReturning() {
System.out.println("执行返回通知");
}
}
|
- 运行并访问:
http://localhost:8088/api/user/hi,结果如下:

1
2
3
4
5
6
7
8
9
10
11
12
13
14
15
16
17
18
19
|
@Aspect
@Component
public class UserAOP_5 {
@Pointcut(value = "execution(* com.example.demo3.controller.UserController.*(..))")
public void pointcut() {
}
@AfterThrowing("pointcut()")
public void AfterThrowing() {
System.out.println("执行异常通知");
}
}
|
- 运行并访问:
http://localhost:8088/api/user/hello,结果如下:(2023/10/25晚)

AOP + 自定义注解
1
2
3
4
5
6
7
8
9
10
11
12
| @Retention(RetentionPolicy.RUNTIME)
@Target({ElementType.METHOD})
@Documented
public @interface WebLog {
String description() default "";
}
|
1
2
3
4
5
6
7
8
9
10
11
12
13
14
15
16
17
18
19
20
21
22
23
24
25
26
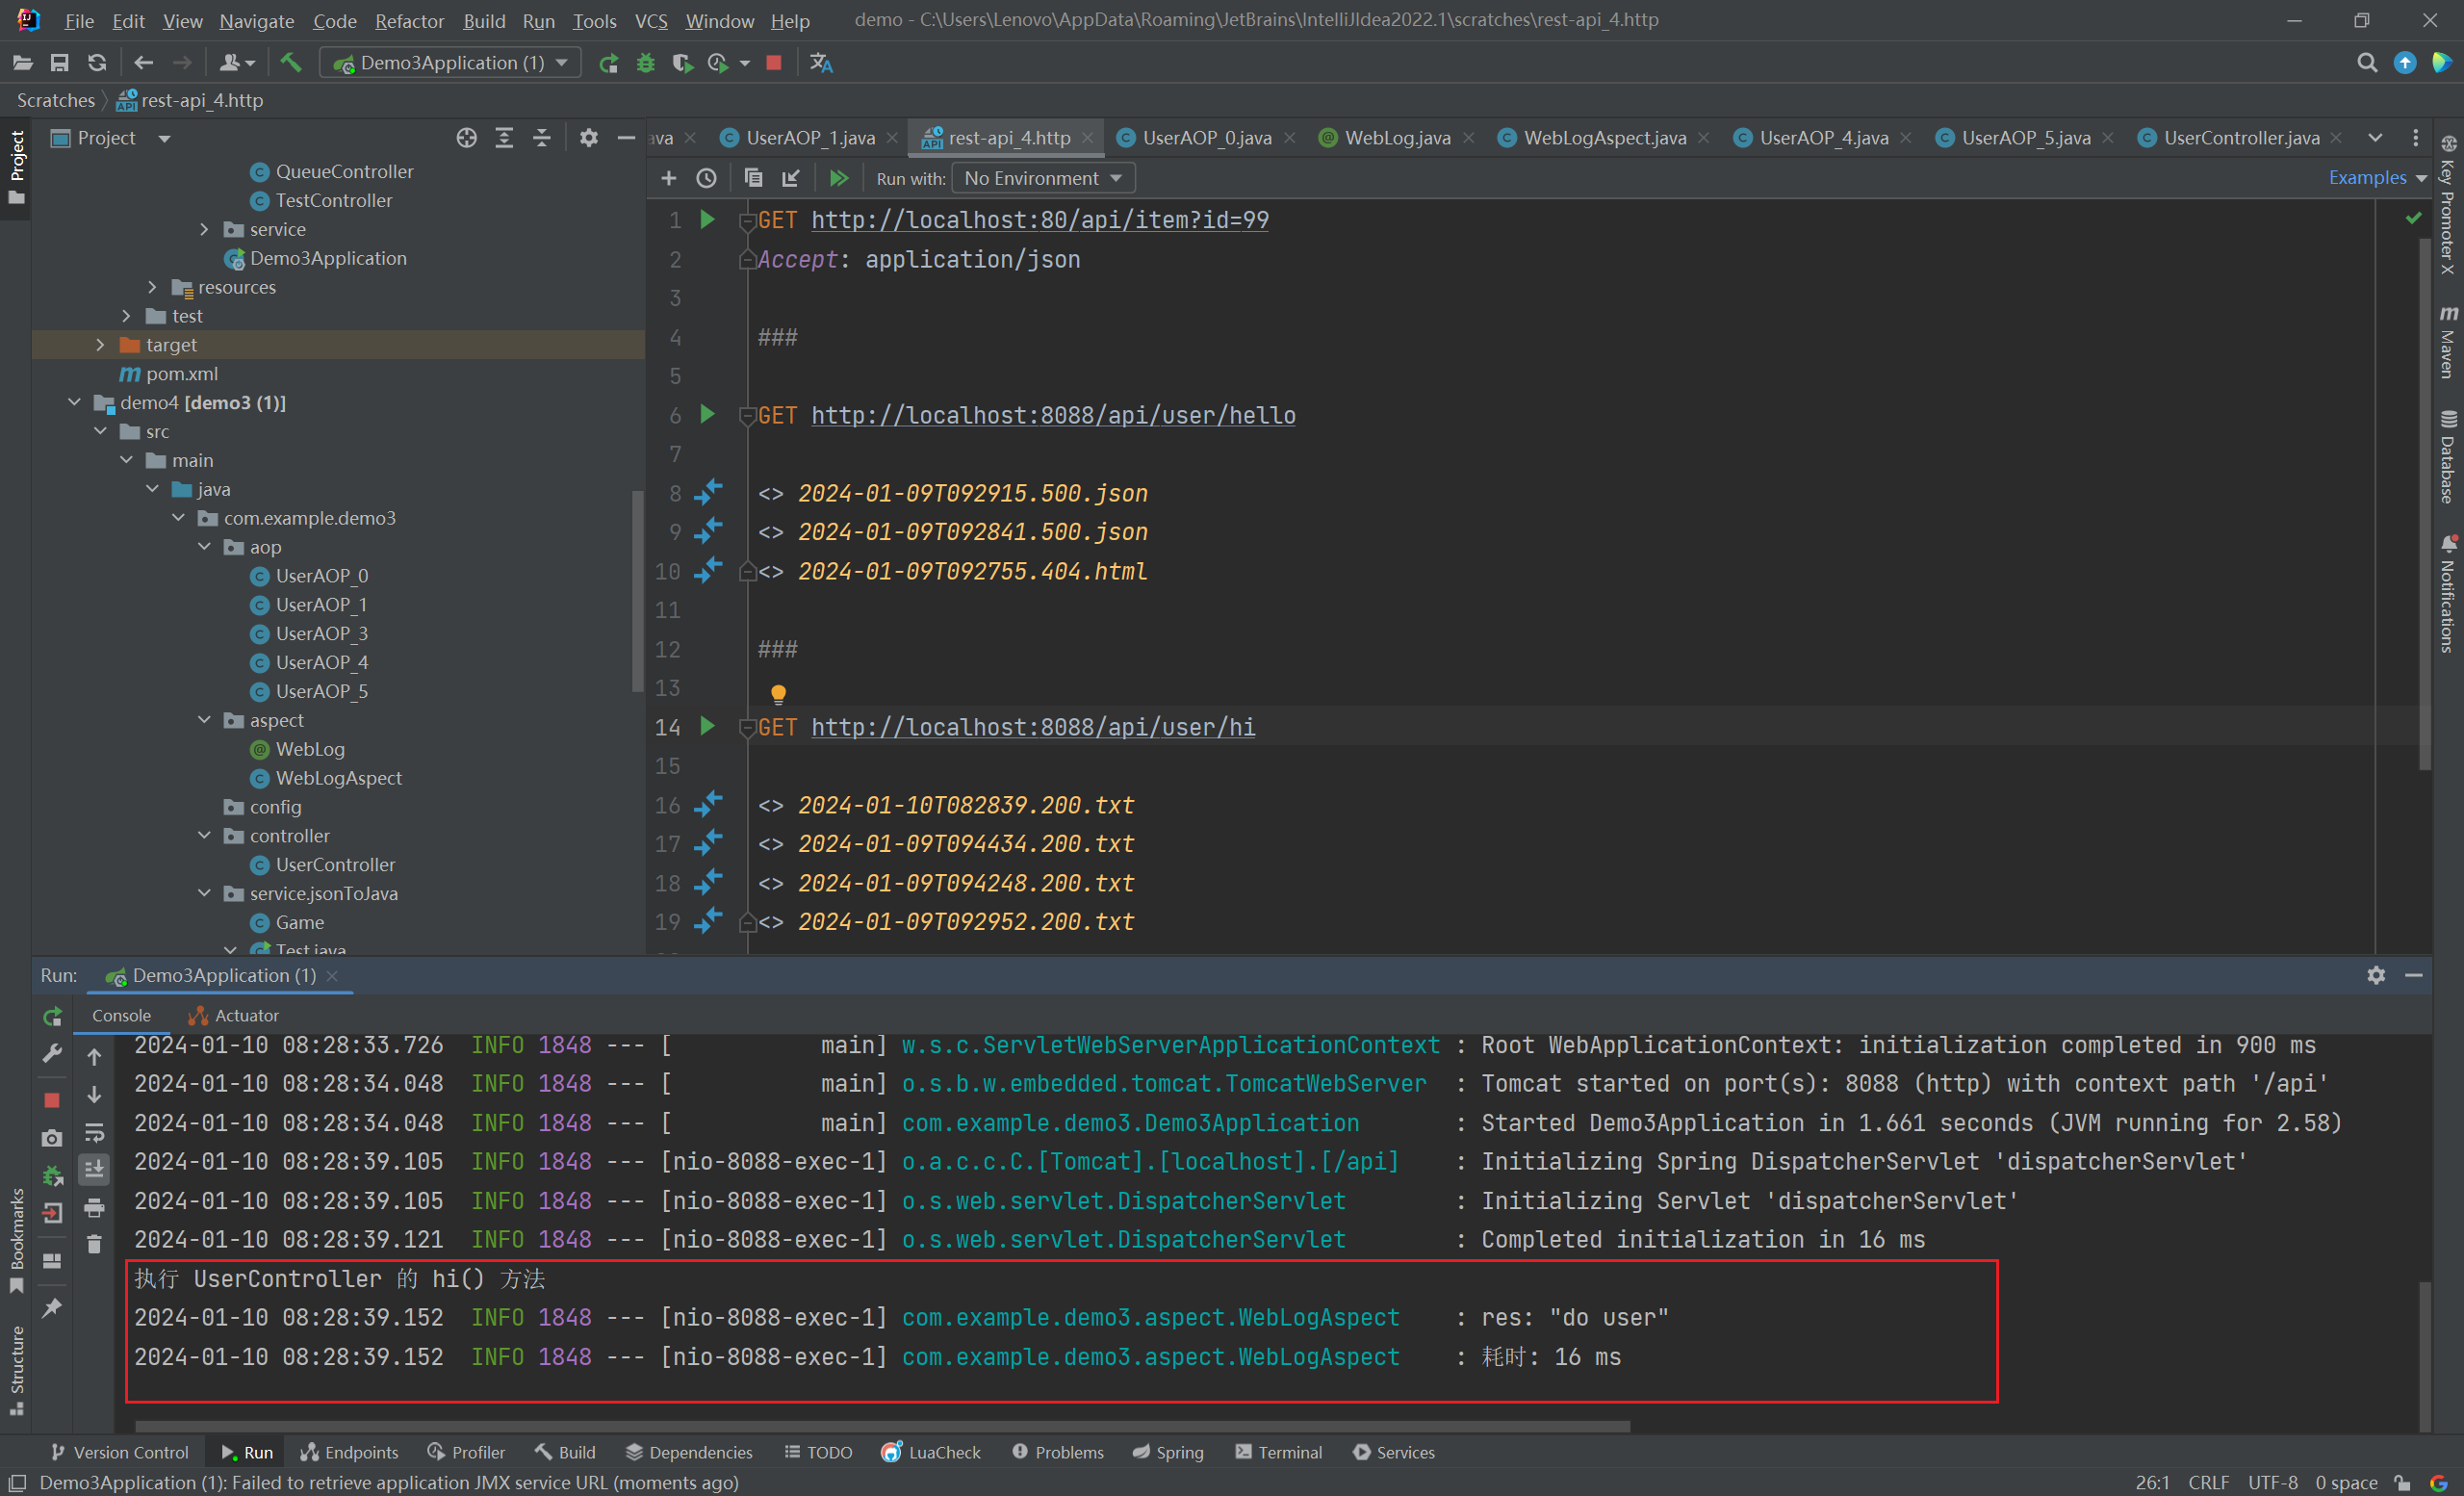
| @Slf4j
@Aspect
@Component
public class WebLogAspect {
@Pointcut("@annotation(com.example.demo3.aspect.WebLog)")
public void WebLog() {
}
@Around("WebLog()")
public Object doAround(ProceedingJoinPoint proceedingJoinPoint) throws Throwable {
long startTime = System.currentTimeMillis();
Object result = proceedingJoinPoint.proceed();
log.info("res: {}", new Gson().toJson(result));
log.info("耗时: {} ms", System.currentTimeMillis() - startTime);
return result;
}
}
|
- 新增控制类
UserController,在需要打印执行日志的方法上,添加 @WebLog 注解:(2024/01/10早)
1
2
3
4
5
6
7
8
9
10
11
12
13
14
15
16
17
18
| @RequestMapping("/user")
@RestController
public class UserController {
@GetMapping("/hi")
@WebLog(description = "你好")
public String hi() {
System.out.println("执行 UserController 的 hi() 方法");
return "do user";
}
@GetMapping("/hello")
@WebLog(description = "你好")
public String hello() {
System.out.println("执行 UserController 的 hello() 方法");
throw new RuntimeException("报错啦!");
}
}
|
- 当启动项目并访问这两个接口时,均可以观察到成功的
输出日志,这表明项目运行正常,且接口功能得到了正确的实现:
配置文件
配置属性映射成员变量/实体类
我们在配置文件 application.yaml 中,填写如下配置:
1
2
| pattern:
dateformat: yyyy-MM-dd HH:mm:ss
|
我们希望将该配置映射至成员变量/ Java 实体类中使用,有以下两种方法:
@Value注解(成员变量)
只需在变量上方添加@Value注解,使用 “$” 符号将指定配置属性映射至该变量即可,如下所示:
1
2
3
4
5
6
7
8
9
10
11
12
| @RestController
@RequestMapping("/order")
public class OrderController {
@Value("${pattern.dateformat}")
private String dataformat;
@GetMapping("/now")
public String now() {
return "@Value: " + LocalDateTime.now().format(DateTimeFormatter.ofPattern(dataformat);
}
}
|
@ConfigurationProperties注解(实体类)
1
2
3
4
5
6
7
| @Data
@Component
@ConfigurationProperties(prefix = "pattern")
public class PatternProperties {
private String dateformat;
}
|
1
2
3
4
5
6
7
8
9
10
11
12
13
| @RestController
@RequestMapping("/order")
public class OrderController {
@Autowired
private PatternProperties patternProperties;
@GetMapping("/now")
public String now() {
return "@Configuration: " + LocalDateTime.now().format(DateTimeFormatter.
ofPattern(patternProperties.getDateformat()));
}
}
|
如上,配置文件中的 pattern 已经成功映射至实体类 PatternProperties,其配置属性分别映射至实体类的同名成员变量
application.yaml配置文件
在项目开发过程中,application.yaml配置文件是必不可少的,那么常用的配置有哪些呢?(2023/07/28晚)
1
2
3
4
5
6
7
8
9
10
11
12
13
14
15
16
17
18
19
20
21
22
23
24
25
26
27
28
29
30
31
32
33
34
35
36
37
38
39
40
41
42
43
44
45
46
47
48
49
50
51
52
53
54
55
56
57
58
59
60
61
62
63
64
65
66
67
68
69
70
71
72
73
74
75
76
77
78
79
80
81
82
83
84
85
86
87
88
89
90
91
92
93
94
95
96
97
98
99
100
101
102
103
104
105
106
107
108
109
110
111
112
113
114
115
116
117
118
119
120
121
122
123
|
spring:
application:
name: memory-api
profiles:
active: dev
mvc:
pathmatch:
matching-strategy: ant_path_matcher
session:
timeout: 2592000
datasource:
driver-class-name: com.mysql.cj.jdbc.Driver
url: jdbc:mysql://localhost:3306/memory_api
username: root
password: Dw990831
servlet:
multipart:
max-file-size: 10MB
server:
address: 0.0.0.0
port: 8101
servlet:
context-path: /api
session:
cookie:
max-age: 2592000
mybatis-plus:
configuration:
map-underscore-to-camel-case: false
log-impl: org.apache.ibatis.logging.stdout.StdOutImpl
global-config:
db-config:
logic-delete-field: isDelete
logic-delete-value: 1
logic-not-delete-value: 0
wx:
mp:
token: xxx
aesKey: xxx
appId: xxx
secret: xxx
config-storage:
http-client-type: HttpClient
key-prefix: wx
redis:
host: 127.0.0.1
port: 6379
type: Memory
open:
appId: xxx
appSecret: xxx
cos:
client:
accessKey: xxx
secretKey: xxx
region: xxx
bucket: xxx
server:
port: 8101
spring:
datasource:
driver-class-name: com.mysql.cj.jdbc.Driver
url: jdbc:mysql://localhost:3306/memory_api
username: root
password: Dw990831
redis:
database: 1
host: localhost
port: 6379
timeout: 5000
password: 123456
elasticsearch:
uris: http://localhost:9200
username: root
password: 123456
mybatis-plus:
configuration:
log-impl: ''
|
JSON 与 Java 对象之间的转换
Jackson
1
2
3
4
5
6
7
8
9
10
11
12
13
14
15
16
17
18
19
| public static void _jackson(String jsonStr, Game game) {
ObjectMapper mapper = new ObjectMapper();
Game toGame = null;
try {
toGame = mapper.readValue(jsonStr, Game.class);
} catch (JsonProcessingException e) {
throw new RuntimeException(e);
}
System.out.println("----------jackson-----------");
System.out.println(toGame);
String toJsonStr = "";
try {
toJsonStr = mapper.writeValueAsString(game);
} catch (JsonProcessingException e) {
throw new RuntimeException(e);
}
System.out.println(toJsonStr);
}
|
FastJson
1
2
3
4
5
6
7
8
9
| public static void _fastjson(String jsonStr, Game game) {
Game toGame = JSONObject.parseObject(jsonStr, Game.class);
System.out.println("----------fastjson-----------");
System.out.println(toGame);
String toJsonStr = JSONObject.toJSONString(game);
System.out.println(toJsonStr);
}
|
Gson
1
2
3
4
5
6
7
8
9
10
| public static void _gson(String jsonStr, Game game) {
Gson gson = new Gson();
Game toGame = gson.fromJson(jsonStr, Game.class);
System.out.println("----------gson-----------");
System.out.println(toGame);
String toJsonStr = gson.toJson(game);
System.out.println(toJsonStr);
}
|
1
2
3
4
5
6
7
8
| public static void _hutool(String jsonStr, Game game) {
Game toGame = JSONUtil.toBean(jsonStr, Game.class);
System.out.println("----------hutool-----------");
System.out.println(toGame);
String toJsonStr = JSONUtil.toJsonStr(game);
System.out.println(toJsonStr);
}
|
1
2
3
4
5
6
7
8
| public static void main(String[] args) throws JsonProcessingException {
String jsonStr = "{\"name\" : \"GTA5\", \"price\" : 54.5}";
Game game = new Game("刺客信条", 288.5);
_jackson(jsonStr, game);
_fastjson(jsonStr, game);
_gson(jsonStr, game);
_hutool(jsonStr, game);
}
|
SpringMVC
请求参数的处理
使用SpringMVC开发时,接收前端请求时,要注意接收请求时的参数写法,分为以下几个情况:
1
2
3
4
5
| http://localhost/backend/page/member/add.html?id=1613789875112910850
http://localhost/employee/page?page=1&pageSize=5
http://localhost/employee/page?page=1&pageSize=5&name=%E9%82%93%E7%BA%AC
|
1
| http://localhost/employee/1613789875112910850
|
- 这种的话就要在形参前加@PathVariable:
1
2
3
| @GetMapping("/{id}")
public R<Employee> getById(@PathVariable Long id) {
}
|
url路径没有携带参数,而是以json数据形式发送,如:
- 那么就用对应实体类作为形参接收,而且要在形参前加@RquestBody(将json数据反序列化到java实体类对象中):
1
| @RequestBody Employee employee
|
什么是 Spring MVC?
MVC 是一种常用的软件设计思想,它将业务逻辑、数据模型和界面显示分离,使得代码更加清晰、可维护。
SpringMVC 是 Spring 框架中的一个重要模块,它基于MVC(Model-View-Controller)设计模式,是一个用于构建Web应用程序的轻量级Web框架。
在SpringMVC中,Controller(控制器)负责处理用户请求并返回响应。
Model(模型)是数据的表示,它包含了应用程序的状态和业务逻辑。
View(视图)是用户界面的表示,它负责显示数据给用户。
Spring MVC 执行流程
当用户发送请求到Web服务器时,SpringMVC的DispatcherServlet(前端控制器)会拦截这些请求,HandlerMapping(处理映射器)根据请求的 URL 映射 / 匹配查找能处理的 Handler(也就是我们平常说的 Controller 控制器),并调用 HandlerAdapter(处理适配器)执行相应的 Controller。Controller 会调用业务逻辑层(通常是 Service 层)来处理请求,获取相应的数据,然后将数据传递给Model。Model 将数据传递给 View 进行渲染;最后,View 将渲染结果返回给用户。
总的来说,SpringMVC 通过 MVC 设计模式将 Web 应用程序的不同部分进行分离,使得代码更加清晰、可维护,提高了开发效率。同时,SpringMVC 还提供了丰富的功能和特性,如数据绑定、异常处理、拦截器等,帮助开发人员更好地构建Web应用程序。
RequestMapping
在SpringMVC中,@RequestMapping是一个用于映射Web请求到特定处理器函数(通常是Controller中的方法)的注解。它可以定义URL路径、HTTP请求方法(GET、POST等)、请求头、请求参数等,使得Controller能够处理特定的请求。
请求控制器
请求控制器在SpringMVC中通常指的是Controller类及其中的方法。它们负责处理用户的请求,调用业务逻辑,并返回视图或数据。Controller是MVC模式中的C部分,负责接收请求和发送响应。
拦截器
拦截器(Interceptor)在SpringMVC中用于在请求处理过程中拦截用户的请求和响应,可以在请求到达Controller之前或响应返回给用户之前执行一些预处理或后处理操作。例如,可以用来进行权限验证、日志记录、性能监控等。
请求参数封装
在SpringMVC中,请求参数可以自动封装到Controller方法的参数中。SpringMVC利用参数绑定机制,可以将请求中的参数(如GET请求的查询参数、POST请求的请求体等)自动绑定到JavaBean、Map或其他数据类型中,简化了参数的获取和处理。
请求过滤器
请求过滤器(Filter)是Servlet规范中的一部分,与SpringMVC不完全相关,但经常在Java Web应用程序中使用。过滤器可以在请求到达Servlet容器中的任何资源之前或之后执行代码。它们常用于处理编码问题、记录日志、压缩响应、身份验证等。
全局异常处理
在SpringMVC中,可以通过实现HandlerExceptionResolver接口或使用@ControllerAdvice和@ExceptionHandler注解来全局处理异常。这样,当Controller中的方法抛出异常时,可以统一捕获和处理这些异常,避免在Controller中分散处理异常代码,提高了代码的可维护性。
RestFul风格
RestFul风格是一种Web服务的设计和开发方式,它强调资源的表示、状态转移和HTTP方法的正确使用。在RestFul风格的Web服务中,每个URL代表一个资源,不同的HTTP方法(GET、POST、PUT、DELETE等)用于操作这些资源。这种设计方式使得Web服务更加简洁、直观和易于理解。
JSON框架
JSON(JavaScript Object Notation)是一种轻量级的数据交换格式。在Java Web应用程序中,常用的JSON框架有Jackson、Gson等。这些框架可以帮助Java应用程序将Java对象转换为JSON格式的字符串,或者将JSON格式的字符串转换为Java对象,从而方便地与前端进行数据交换。
MVC模式
例子:假设我们要开发一个简单的用户管理系统,其中包含用户列表的展示和用户的增删改查功能。
- Model:包含用户数据(User类)和用户管理逻辑(UserService类)。
- View:HTML页面,展示用户列表、用户详情等。
- Controller:处理用户的请求,如展示用户列表(listUsers方法)、添加用户(addUser方法)等。
当用户点击“展示用户列表”按钮时,Controller调用Model获取用户数据,并将数据传递给View进行展示。
RequestMapping
例子:在Controller中,我们可以使用@RequestMapping注解来定义URL路径和HTTP方法。
1
2
3
4
5
6
7
8
9
10
11
12
13
14
15
16
17
18
| @Controller
public class UserController {
@RequestMapping(value = "/users", method = RequestMethod.GET)
public String listUsers(Model model) {
List<User> users = userService.findAllUsers();
model.addAttribute("users", users);
return "userList";
}
@RequestMapping(value = "/users/add", method = RequestMethod.POST)
public String addUser(@ModelAttribute User user) {
userService.addUser(user);
return "redirect:/users";
}
}
|
请求控制器
例子:在上面的UserController中,listUsers和addUser方法就是请求控制器的具体实现。它们分别处理GET请求和POST请求,控制用户的展示和添加操作。
拦截器
例子:实现一个登录拦截器,检查用户是否已登录。
1
2
3
4
5
6
7
8
9
10
11
12
13
14
| public class LoginInterceptor implements HandlerInterceptor {
@Override
public boolean preHandle(HttpServletRequest request, HttpServletResponse response, Object handler) {
if (!isUserLoggedIn(request)) {
response.sendRedirect("/login");
return false;
}
return true;
}
}
|
请求参数封装
例子:在addUser方法中,使用@ModelAttribute注解来自动将请求参数封装到User对象中。
1
2
3
4
5
6
| @RequestMapping(value = "/users/add", method = RequestMethod.POST)
public String addUser(@ModelAttribute User user) {
userService.addUser(user);
return "redirect:/users";
}
|
请求过滤器
例子:实现一个字符编码过滤器,确保所有请求的字符编码统一。
1
2
3
4
5
6
7
8
9
10
11
| public class CharacterEncodingFilter implements Filter {
@Override
public void doFilter(ServletRequest request, ServletResponse response, FilterChain chain) {
request.setCharacterEncoding("UTF-8");
response.setCharacterEncoding("UTF-8");
chain.doFilter(request, response);
}
}
|
全局异常处理
例子:使用@ControllerAdvice和@ExceptionHandler注解实现全局异常处理。
1
2
3
4
5
6
7
8
9
10
11
12
| @ControllerAdvice
public class GlobalExceptionHandler {
@ExceptionHandler(value = Exception.class)
public ModelAndView defaultErrorHandler(HttpServletRequest req, Exception e) {
ModelAndView mav = new ModelAndView();
mav.addObject("exception", e);
mav.addObject("url", req.getRequestURL());
mav.setViewName("error");
return mav;
}
}
|
RestFul风格
例子:设计一个简单的RESTful API用于用户管理。
1
2
3
4
5
6
7
8
9
10
11
12
| @RestController
@RequestMapping("/api/users")
public class UserRestController {
@GetMapping
public List<User> getAllUsers() {
return userService.findAllUsers();
}
@GetMapping("/{id}")
public User getUserById(@PathVariable Long id) {
return userService.findUserById(id);
|
数据绑定
例子:在Web表单中,用户输入的数据可以通过数据绑定自动映射到JavaBean对象中。
1
2
3
4
5
6
| @PostMapping("/register")
public String registerUser(@ModelAttribute("user") User user) {
userService.registerUser(user);
return "redirect:/login";
}
|
在上面的例子中,@ModelAttribute("user")注解告诉Spring MVC将表单中的数据绑定到名为user的Model属性上,并自动映射到User对象。
视图解析
例子:使用Thymeleaf作为视图解析器,将Model中的数据渲染到HTML页面中。
1
2
3
4
5
6
7
8
9
10
11
12
13
14
| <!DOCTYPE html>
<html xmlns:th="http://www.thymeleaf.org">
<head>
<title>User List</title>
</head>
<body>
<h1>User List</h1>
<ul>
<li th:each="user : ${users}">
<span th:text="${user.name}"></span>
</li>
</ul>
</body>
</html>
|
在上面的Thymeleaf模板中,${users}表示从Model中获取名为users的属性,该属性应该是一个User对象的列表。th:each用于遍历这个列表,th:text用于将每个用户的名字渲染到页面上。
消息转换器
例子:使用@ResponseBody注解和HttpMessageConverter接口实现JSON数据的自动转换。
1
2
3
4
5
6
7
8
9
10
| @RestController
@RequestMapping("/api/users")
public class UserRestController {
@GetMapping("/{id}")
public ResponseEntity<User> getUserById(@PathVariable Long id) {
User user = userService.findUserById(id);
return ResponseEntity.ok(user);
}
}
|
在上面的例子中,当调用getUserById方法时,Spring MVC会自动使用合适的HttpMessageConverter(如MappingJackson2HttpMessageConverter)将User对象转换为JSON格式的响应体。
异步请求处理
例子:使用@Async注解实现异步请求处理,提高系统的响应速度。
1
2
3
4
5
6
7
8
9
10
11
12
13
14
| @Service
public class AsyncUserService {
@Async
public void sendEmailAsync(String email, String message) {
try {
Thread.sleep(5000);
} catch (InterruptedException e) {
e.printStackTrace();
}
System.out.println("Email sent to " + email + " with message: " + message);
}
}
|
在上面的例子中,sendEmailAsync方法被标记为异步方法。当调用这个方法时,它不会阻塞主线程的执行,而是在另一个线程中执行。这样,即使发送邮件的操作很耗时,也不会影响主线程的响应速度。
当然,Spring MVC的功能非常强大和灵活,还有许多其他的特性和例子可以探讨。以下是继续列举的一些常见功能和相应的例子:
拦截器(Interceptors)
例子:使用拦截器在请求处理之前或之后执行一些公共逻辑,如日志记录、权限验证等。
1
2
3
4
5
6
7
8
9
10
11
12
13
14
15
16
17
18
19
| @Component
public class LoggingInterceptor implements HandlerInterceptor {
@Override
public boolean preHandle(HttpServletRequest request, HttpServletResponse response, Object handler) throws Exception {
System.out.println("Before request handled: " + request.getRequestURI());
return true;
}
@Override
public void postHandle(HttpServletRequest request, HttpServletResponse response, Object handler, ModelAndView modelAndView) throws Exception {
System.out.println("After request handled: " + request.getRequestURI());
}
@Override
public void afterCompletion(HttpServletRequest request, HttpServletResponse response, Object handler, Exception ex) throws Exception {
System.out.println("Request completed: " + request.getRequestURI());
}
}
|
然后,你需要在Spring MVC的配置中注册这个拦截器:
1
2
3
4
5
6
7
8
9
10
11
| @Configuration
public class WebConfig implements WebMvcConfigurer {
@Autowired
private LoggingInterceptor loggingInterceptor;
@Override
public void addInterceptors(InterceptorRegistry registry) {
registry.addInterceptor(loggingInterceptor);
}
}
|
静态资源处理
例子:配置Spring MVC以提供静态资源,如HTML、CSS、JavaScript和图片文件。
1
2
3
4
5
6
7
8
9
| @Configuration
public class WebConfig implements WebMvcConfigurer {
@Override
public void addResourceHandlers(ResourceHandlerRegistry registry) {
registry.addResourceHandler("/resources/**")
.addResourceLocations("/public-resources/");
}
}
|
在这个例子中,所有以/resources/开头的URL请求都会被映射到/public-resources/目录下的静态资源。
自定义异常处理
例子:创建自定义异常处理器,用于处理特定的异常并返回合适的HTTP响应。
1
2
3
4
5
6
7
8
9
10
11
| @ControllerAdvice
public class CustomExceptionHandler {
@ExceptionHandler(value = CustomException.class)
@ResponseStatus(HttpStatus.BAD_REQUEST)
@ResponseBody
public ErrorResponse handleCustomException(CustomException ex) {
ErrorResponse response = new ErrorResponse("Error", ex.getMessage());
return response;
}
}
|
在这个例子中,当抛出CustomException时,Spring MVC会调用handleCustomException方法,并返回一个包含错误信息的JSON响应体。
文件上传
例子:实现文件上传功能,允许用户上传文件到服务器。
1
2
3
4
5
6
7
8
9
10
11
12
13
14
| @PostMapping("/upload")
public String handleFileUpload(@RequestParam("file") MultipartFile file) {
if (!file.isEmpty()) {
try {
byte[] bytes = file.getBytes();
return "File uploaded successfully!";
} catch (Exception e) {
e.printStackTrace();
}
}
return "Failed to upload file!";
}
|
在这个例子中,@RequestParam("file")注解告诉Spring MVC从请求中提取名为file的上传文件,并将其绑定到MultipartFile类型的参数上。然后你可以读取文件内容并保存到服务器的文件系统或其他存储服务中。
这些只是Spring MVC中一小部分功能的例子。Spring MVC是一个功能丰富的框架,它提供了许多其他的特性和选项,可以根据项目的具体需求进行定制和扩展。
Spring 成神之路
依赖查找与依赖注入
🔥 Spring高手之路1——深入理解与实现IOC依赖查找与依赖注入-CSDN博客
🍖 Spring系列一:Spring基础篇_spring 基础-CSDN博客
聊聊Spring中最常用的11个扩展点 - 掘金 (juejin.cn)
在 IOC (控制反转)的背景下,解决对象间依赖关系:(2023/11/16午)
- 依赖查找(DL):显示调用 API 查找、使用@Autowired ;@Resource 依赖注入前隐式查找
- 依赖注入(DI):基于 Setter 的依赖注入、基于构造器的依赖注入、使用@Autowired ;@Resource 依赖注入
Bean 装载 / 注册
🔥 Spring高手之路2——深入理解注解驱动配置与XML配置的融合与区别_spring注解和xml-CSDN博客
- Bean 注册(@Configuration、@Bean)、组件注册(@Component、@Controller、@Service、@Repository)
- 配置类(注解驱动配置)替代 XML 配置文件(XML 配置驱动)、两者配合使用(2023/11/17午)
属性注入
我们使用 XML 配置文件作好 Bean 的装载 / 注册后,进行 Bean 的属性注入(2023/11/18晚)
Setter 属性注入:使用 XML 文件 / 使用 @Bean 注解
构造器属性注入:使用 XML 文件 / 使用 @Bean 注解
注解式属性注入:@Value 属性注入
1
2
3
4
5
| @Value("white-value-annotation")
private String title;
@Value("1")
private Integer rank;
|
1
| @PropertySource("classpath:blue.properties")
|
1
2
|
<context:property-placeholder location="classpath:blue.properties"/>
|
1
2
| @Value("${blue.title}")
private String title;
|
1
2
3
| appTest:
name: MyApp
version: 1.0.0
|
1
| @ConfigurationProperties(prefix = "appTest")
|
1
2
3
4
5
| @Value("${appTest.name}")
private String name;
@Value("${appTest.version}")
private String version;
|
Bean 的生命周期
🍖 推荐阅读:Spring系列三:Spring Bean生命周期_springbean 属性赋值和初始化区别-CSDN博客
在 Spring 框架中,控制 Bean 生命周期的三种方式是:(2023/11/20晚)
1、使用 Spring 的 init-method 和 destory-method (在 XML 配置或者 java 配置中自定义的初始化和销毁方法)
1
2
3
4
5
6
7
8
9
10
| <?xml version="1.0" encoding="UTF-8"?>
<beans xmlns="http://www.springframework.org/schema/beans"
xmlns:xsi="http://www.w3.org/2001/XMLSchema-instance"
xsi:schemaLocation="http://www.springframework.org/schema/beans http://www.springframework.org/schema/beans/spring-beans.xsd">
<bean class="com.example.demo.bean.Lion"
init-method="init" destroy-method="destroy">
<property name="name" value="simba"/>
</bean>
</beans>
|
1
2
3
4
5
6
7
8
9
10
11
| @Configuration
@ImportResource("classpath:applicationContext.xml")
public class AnimalConfig {
@Bean(initMethod = "init", destroyMethod = "destroy")
public Elephant elephant() {
Elephant elephant = new Elephant();
elephant.setName("Dumbo");
return elephant;
}
}
|
2、使用 JSR-250 规范的 @PostConstruct 和 @PreDestory 注解
1
2
3
4
5
6
7
8
9
| @PostConstruct
public void init() {
System.out.println("Lion is going through init.");
}
@PreDestroy
public void destroy() {
System.out.println("Lion is going through destroy.");
}
|
3、实现 Spring 的 InitializingBean 和 DisposableBean 接口
1
2
3
4
5
6
7
8
9
10
11
12
13
14
15
16
17
18
19
20
21
22
| @Component
public class Lion implements InitializingBean, DisposableBean {
private Integer energy;
@Override
public void afterPropertiesSet() throws Exception {
System.out.println("狮子已经充满能量。。。");
this.energy = 100;
}
@Override
public void destroy() throws Exception {
System.out.println("狮子已经消耗完所有能量。。。");
this.energy = 0;
}
@Override
public String toString() {
return "Lion{" + "energy=" + energy + '}';
}
}
|
三种生命周期并存时,在 Spring 框架中单例 Bean 的初始化和销毁过程有这样的执行顺序:
- 初始化顺序:@PostConstruct -> InitializingBean -> init-method
- 销毁顺序:@PreDestory -> DisposableBean -> destroy-method
简单总结 Spring Bean 生命周期流程:
- 实例化:启动 Spring 应用,IOC 容器为所有已声明的 Bean 创建一个实例
- 属性赋值:实例化后,Spring 通过反射机制给 Bean 的属性赋值
- 调用 Bean 的初始化方法:调用 Bean 配置的
@PostConstruct、afterPropertiesSet方法或者init-method指定的方法
- Bean 运行期:Bean 已经准备好被程序使用了,它已经被初始化并赋值完成
- Bean 销毁:当容器关闭时,调用
Bean的销毁方法
一个例子,带你了解 Bean 的一生
- 尝试编写一段代码,直观体现一个 Bean 从创建到销毁的整个过程(2023/11/26晚)
实例化
- 实例化:启动 Spring 应用,IOC 容器为所有已声明的 Bean 创建一个实例
1
2
3
| public PersonBean() {
System.out.println("调用构造方法,创建实例");
}
|
设置属性
- 属性赋值:实例化后,Spring 通过反射机制给 Bean 的属性赋值
1
2
3
4
5
6
7
8
9
|
private String name;
public void setName(String name) {
this.name = name;
System.out.println("设置 Bean 属性);
}
|
初始化
设置相关依赖
检查 Aware 相关接口并设置相关依赖:
1
2
3
4
5
6
7
8
9
10
11
12
| public class PersonBean implements BeanFactoryAware, BeanNameAware {
@Override
public void setBeanName(String s) {
System.out.println("设置 Bean Name");
}
@Override
public void setBeanFactory(BeanFactory beanFactory) throws BeansException {
System.out.println("设置 Bean Factory");
}
}
|
前置处理
1
2
3
4
5
6
7
8
9
| @Component
public class MyBeanPostProcessor implements BeanPostProcessor {
@Override
public Object postProcessBeforeInitialization(Object bean, String beanName) throws BeansException {
System.out.println("前置处理");
return bean;
}
}
|
初始化
真正的初始化,这里的初始化便是自定义 init-method 和 destory-method 方法,常见的有三种方式:
1、使用 Spring 的 init-method 和 destory-method (在 XML 配置或者 java 配置中自定义的初始化和销毁方法)
1
2
3
4
5
6
7
8
9
10
| <?xml version="1.0" encoding="UTF-8"?>
<beans xmlns="http://www.springframework.org/schema/beans"
xmlns:xsi="http://www.w3.org/2001/XMLSchema-instance"
xsi:schemaLocation="http://www.springframework.org/schema/beans http://www.springframework.org/schema/beans/spring-beans.xsd">
<bean class="com.example.demo.bean.Lion"
init-method="init" destroy-method="destroy">
<property name="name" value="simba"/>
</bean>
</beans>
|
1
2
3
4
5
6
7
8
9
10
11
| @Configuration
@ImportResource("classpath:applicationContext.xml")
public class AnimalConfig {
@Bean(initMethod = "init", destroyMethod = "destroy")
public Elephant elephant() {
Elephant elephant = new Elephant();
elephant.setName("Dumbo");
return elephant;
}
}
|
2、使用 JSR-250 规范的 @PostConstruct 和 @PreDestory 注解
1
2
3
4
5
6
7
8
9
| @PostConstruct
public void init() {
System.out.println("Lion is going through init.");
}
@PreDestroy
public void destroy() {
System.out.println("Lion is going through destroy.");
}
|
3、实现 Spring 的 InitializingBean 和 DisposableBean 接口
1
2
3
4
5
6
7
8
9
10
11
12
13
14
15
16
17
18
19
20
21
22
| @Component
public class Lion implements InitializingBean, DisposableBean {
private Integer energy;
@Override
public void afterPropertiesSet() throws Exception {
System.out.println("狮子已经充满能量。。。");
this.energy = 100;
}
@Override
public void destroy() throws Exception {
System.out.println("狮子已经消耗完所有能量。。。");
this.energy = 0;
}
@Override
public String toString() {
return "Lion{" + "energy=" + energy + '}';
}
}
|
三种生命周期并存时,在 Spring 框架中单例 Bean 的初始化和销毁过程有这样的执行顺序:
- 初始化顺序:@PostConstruct -> InitializingBean -> init-method
- 销毁顺序:@PreDestory -> DisposableBean -> destroy-method
后置处理
1
2
3
4
5
6
7
8
9
| @Component
public class MyBeanPostProcessor implements BeanPostProcessor {
@Override
public Object postProcessAfterInitialization(Object bean, String beanName) throws BeansException {
System.out.println("后置处理");
return bean;
}
}
|
运行
Bean 运行期:Bean 已经准备好被程序使用了,它已经被初始化并赋值完成
销毁
Bean 销毁:当容器关闭时,调用Bean的销毁方法,这里的销毁方法,在前面真正的初始化中已涉及到,这里不再赘述
Spring Boot 启动流程
🍖 推荐阅读:面试官:SpringBoot的启动流程清楚吗? - 掘金 (juejin.cn)
动手实现一个简易版 Spring
1
2
3
4
5
| public class UserDao {
public void queryUserInfo(){
System.out.println("A good man.");
}
}
|
- 通过配置文件
beans.properties 指定要加载的 Bean:
1
| userDao=EasySpring.UserDao
|
- 资源加载器
ResourceLoader,完成配置文件中 Bean 的加载:
1
2
3
4
5
6
7
8
9
10
11
12
13
14
15
16
17
18
19
20
21
22
23
24
25
| public class ResourceLoader {
public static Map<String, BeanDefinition> getResource() {
Map<String, BeanDefinition> beanDefinitionMap = new HashMap<>(16);
Properties properties = new Properties();
try {
InputStream inputStream = ResourceLoader.class.getResourceAsStream("beans.properties");
properties.load(inputStream);
Iterator<String> it = properties.stringPropertyNames().iterator();
while (it.hasNext()) {
String key = it.next();
String className = properties.getProperty(key);
BeanDefinition beanDefinition = new BeanDefinition();
beanDefinition.setBeanName(key);
Class clazz = Class.forName(className);
beanDefinition.setBeanClass(clazz);
beanDefinitionMap.put(key, beanDefinition);
}
inputStream.close();
} catch (IOException | ClassNotFoundException e) {
e.printStackTrace();
}
return beanDefinitionMap;
}
}
|
Bean 注册器 BeanRegister,缓存已经加载完成的 Bean 实例:
1
2
3
4
5
6
7
8
9
10
11
12
13
14
15
16
17
18
19
20
21
22
23
24
25
26
| public class BeanRegister {
private Map<String, Object> singletonMap = new HashMap<>(32);
public Object getSingletonBean(String beanName) {
return singletonMap.get(beanName);
}
public void registerSingletonBean(String beanName, Object bean) {
if (singletonMap.containsKey(beanName)) {
return;
}
singletonMap.put(beanName, bean);
}
}
|
1
2
3
4
5
6
7
8
9
10
11
12
13
14
15
16
17
18
19
20
21
22
23
| public class BeanDefinition {
private String beanName;
private Class beanClass;
public String getBeanName() {
return beanName;
}
public void setBeanName(String beanName) {
this.beanName = beanName;
}
public Class getBeanClass() {
return beanClass;
}
public void setBeanClass(Class beanClass) {
this.beanClass = beanClass;
}
}
|
1
2
3
4
5
6
7
8
9
10
11
12
13
14
15
16
17
18
19
20
21
22
23
24
25
26
27
28
29
30
31
32
33
34
35
36
37
38
39
40
41
42
43
44
45
46
47
48
| public class BeanFactory {
private Map<String, BeanDefinition> beanDefinitionMap = new HashMap<>();
private BeanRegister beanRegister;
public BeanFactory() {
beanRegister = new BeanRegister();
this.beanDefinitionMap = new ResourceLoader().getResource();
}
public Object getBean(String beanName) {
Object bean = beanRegister.getSingletonBean(beanName);
if (bean != null) {
return bean;
}
return createBean(beanDefinitionMap.get(beanName));
}
private Object createBean(BeanDefinition beanDefinition) {
try {
Object bean = beanDefinition.getBeanClass().newInstance();
beanRegister.registerSingletonBean(beanDefinition.getBeanName(), bean);
return bean;
} catch (InstantiationException | IllegalAccessException e) {
e.printStackTrace();
}
return null;
}
}
|
1
2
3
4
5
6
7
8
| -EasySpring
-ApiTest.java
-BeanDefinition.java
-BeanFactory.java
-BeanRegister.java
-ResourceLoader.java
-UserDao.java
-beans.properties
|
1
2
3
4
5
6
7
8
9
10
11
12
13
14
15
16
17
18
19
20
| package EasySpring;
public class ApiTest {
public static void test_BeanFactory() {
BeanFactory beanFactory = new BeanFactory();
UserDao userDao1 = (UserDao) beanFactory.getBean("userDao");
userDao1.queryUserInfo();
UserDao userDao2 = (UserDao) beanFactory.getBean("userDao");
userDao2.queryUserInfo();
}
public static void main(String[] args) {
test_BeanFactory();
}
}
|
1
2
3
4
5
6
7
8
9
10
11
12
13
14
15
16
17
18
19
20
21
22
23
24
25
26
| package EasySpring;
public class BeanDefinition {
private String beanName;
private Class beanClass;
public String getBeanName() {
return beanName;
}
public void setBeanName(String beanName) {
this.beanName = beanName;
}
public Class getBeanClass() {
return beanClass;
}
public void setBeanClass(Class beanClass) {
this.beanClass = beanClass;
}
}
|
1
2
3
4
5
6
7
8
9
10
11
12
13
14
15
16
17
18
19
20
21
22
23
24
25
26
27
28
29
30
31
32
33
34
35
36
37
38
39
40
41
42
43
44
45
46
47
48
49
50
51
52
| package EasySpring;
import java.util.HashMap;
import java.util.Map;
public class BeanFactory {
private Map<String, BeanDefinition> beanDefinitionMap = new HashMap<>();
private BeanRegister beanRegister;
public BeanFactory() {
beanRegister = new BeanRegister();
this.beanDefinitionMap = new ResourceLoader().getResource();
}
public Object getBean(String beanName) {
Object bean = beanRegister.getSingletonBean(beanName);
if (bean != null) {
return bean;
}
return createBean(beanDefinitionMap.get(beanName));
}
private Object createBean(BeanDefinition beanDefinition) {
try {
Object bean = beanDefinition.getBeanClass().newInstance();
beanRegister.registerSingletonBean(beanDefinition.getBeanName(), bean);
return bean;
} catch (InstantiationException | IllegalAccessException e) {
e.printStackTrace();
}
return null;
}
}
|
1
2
3
4
5
6
7
8
9
10
11
12
13
14
15
16
17
18
19
20
21
22
23
24
25
26
27
28
29
30
31
32
33
| package EasySpring;
import java.util.HashMap;
import java.util.Map;
public class BeanRegister {
private Map<String, Object> singletonMap = new HashMap<>(32);
public Object getSingletonBean(String beanName) {
return singletonMap.get(beanName);
}
public void registerSingletonBean(String beanName, Object bean) {
if (singletonMap.containsKey(beanName)) {
return;
}
singletonMap.put(beanName, bean);
}
}
|
1
2
3
4
5
6
7
8
9
10
11
12
13
14
15
16
17
18
19
20
21
22
23
24
25
26
27
28
29
30
31
32
33
34
35
| package EasySpring;
import java.io.IOException;
import java.io.InputStream;
import java.util.HashMap;
import java.util.Iterator;
import java.util.Map;
import java.util.Properties;
public class ResourceLoader {
public static Map<String, BeanDefinition> getResource() {
Map<String, BeanDefinition> beanDefinitionMap = new HashMap<>(16);
Properties properties = new Properties();
try {
InputStream inputStream = ResourceLoader.class.getResourceAsStream("beans.properties");
properties.load(inputStream);
Iterator<String> it = properties.stringPropertyNames().iterator();
while (it.hasNext()) {
String key = it.next();
String className = properties.getProperty(key);
BeanDefinition beanDefinition = new BeanDefinition();
beanDefinition.setBeanName(key);
Class clazz = Class.forName(className);
beanDefinition.setBeanClass(clazz);
beanDefinitionMap.put(key, beanDefinition);
}
inputStream.close();
} catch (IOException | ClassNotFoundException e) {
e.printStackTrace();
}
return beanDefinitionMap;
}
}
|
1
2
3
4
5
6
7
| package EasySpring;
public class UserDao {
    public void queryUserInfo(){
        System.out.println("A good man.");
    }
}
|
1
| userDao=EasySpring.UserDao
|
Spring Boot 的扩展点
🍿 推荐阅读:聊聊Spring中最常用的11个扩展点 - 掘金 (juejin.cn)
项目启动时
有时候我们需要在项目启动时定制化一些附加功能,比如:加载一些系统参数、完成初始化、预热本地缓存等,该怎么办呢?(2024/01/08晚)
1
2
3
4
5
6
7
8
9
10
| @Component
public class TestRunner implements ApplicationRunner {
@Resource
public NameService nameService;
public void run(ApplicationArguments args) throws Exception {
nameService.say();
}
}
|
- 实现
ApplicationRunner接口,重写run方法,在该方法中实现自己定制化需求。
- 如果项目中有多个类实现了ApplicationRunner接口,他们的执行顺序要怎么指定呢?
- 答案是使用
@Order(n)注解,n的值越小越先执行。当然也可以通过@Priority注解指定顺序。
精髓所在