本文最后更新于:3 个月前
破冰
🍖 IntelliJ IDEA:一个不可或缺的利器
- 提升开发效率的利器:IntelliJ IDEA在Java开发领域的重要性
- 探索功能和特性:深入探索IntelliJ IDEA的强大功能和特性
- 从基础到高级:从配置和设置开始,逐步介绍常用功能和高级技巧
- 启程进入IntelliJ IDEA世界:探索其中的奇妙与无穷可能
- 适用于初学者和经验丰富的开发者:为你打开高效编码的大门
- 享受Java开发的旅程:让我们一同探索这个编程基石的奥妙
思维碰撞
使用技巧
常用快捷键
Ctrl + S:保存
Ctrl + A:全选
Ctrl + F:当前页面搜索
Ctrl + Shift + R / 双击shift:全局搜索
多端口启动项目
在使用IDEA作Java + Spring全家桶框架后端开发时,经常要多端口跑项目,那么借助IDEA,这种操作怎样实现呢?
最近在学习SpringCloud微服务,就拿其中一个微服务来演示吧
首先,运行UserService服务:

如上图所示,该服务已在8099端口运行
接下来我们就要实现多端口运行UserService服务了
复制一份UserService服务运行实例:


点击确认,在 Not Started下 即可找到复制后的服务:

启动该服务,即可看到 User在7099端口成功运行了:

SpringBoot版本与JDK版本不兼容
今天新构建了一个新的SpringBoot项目模板,启动项目时报错:
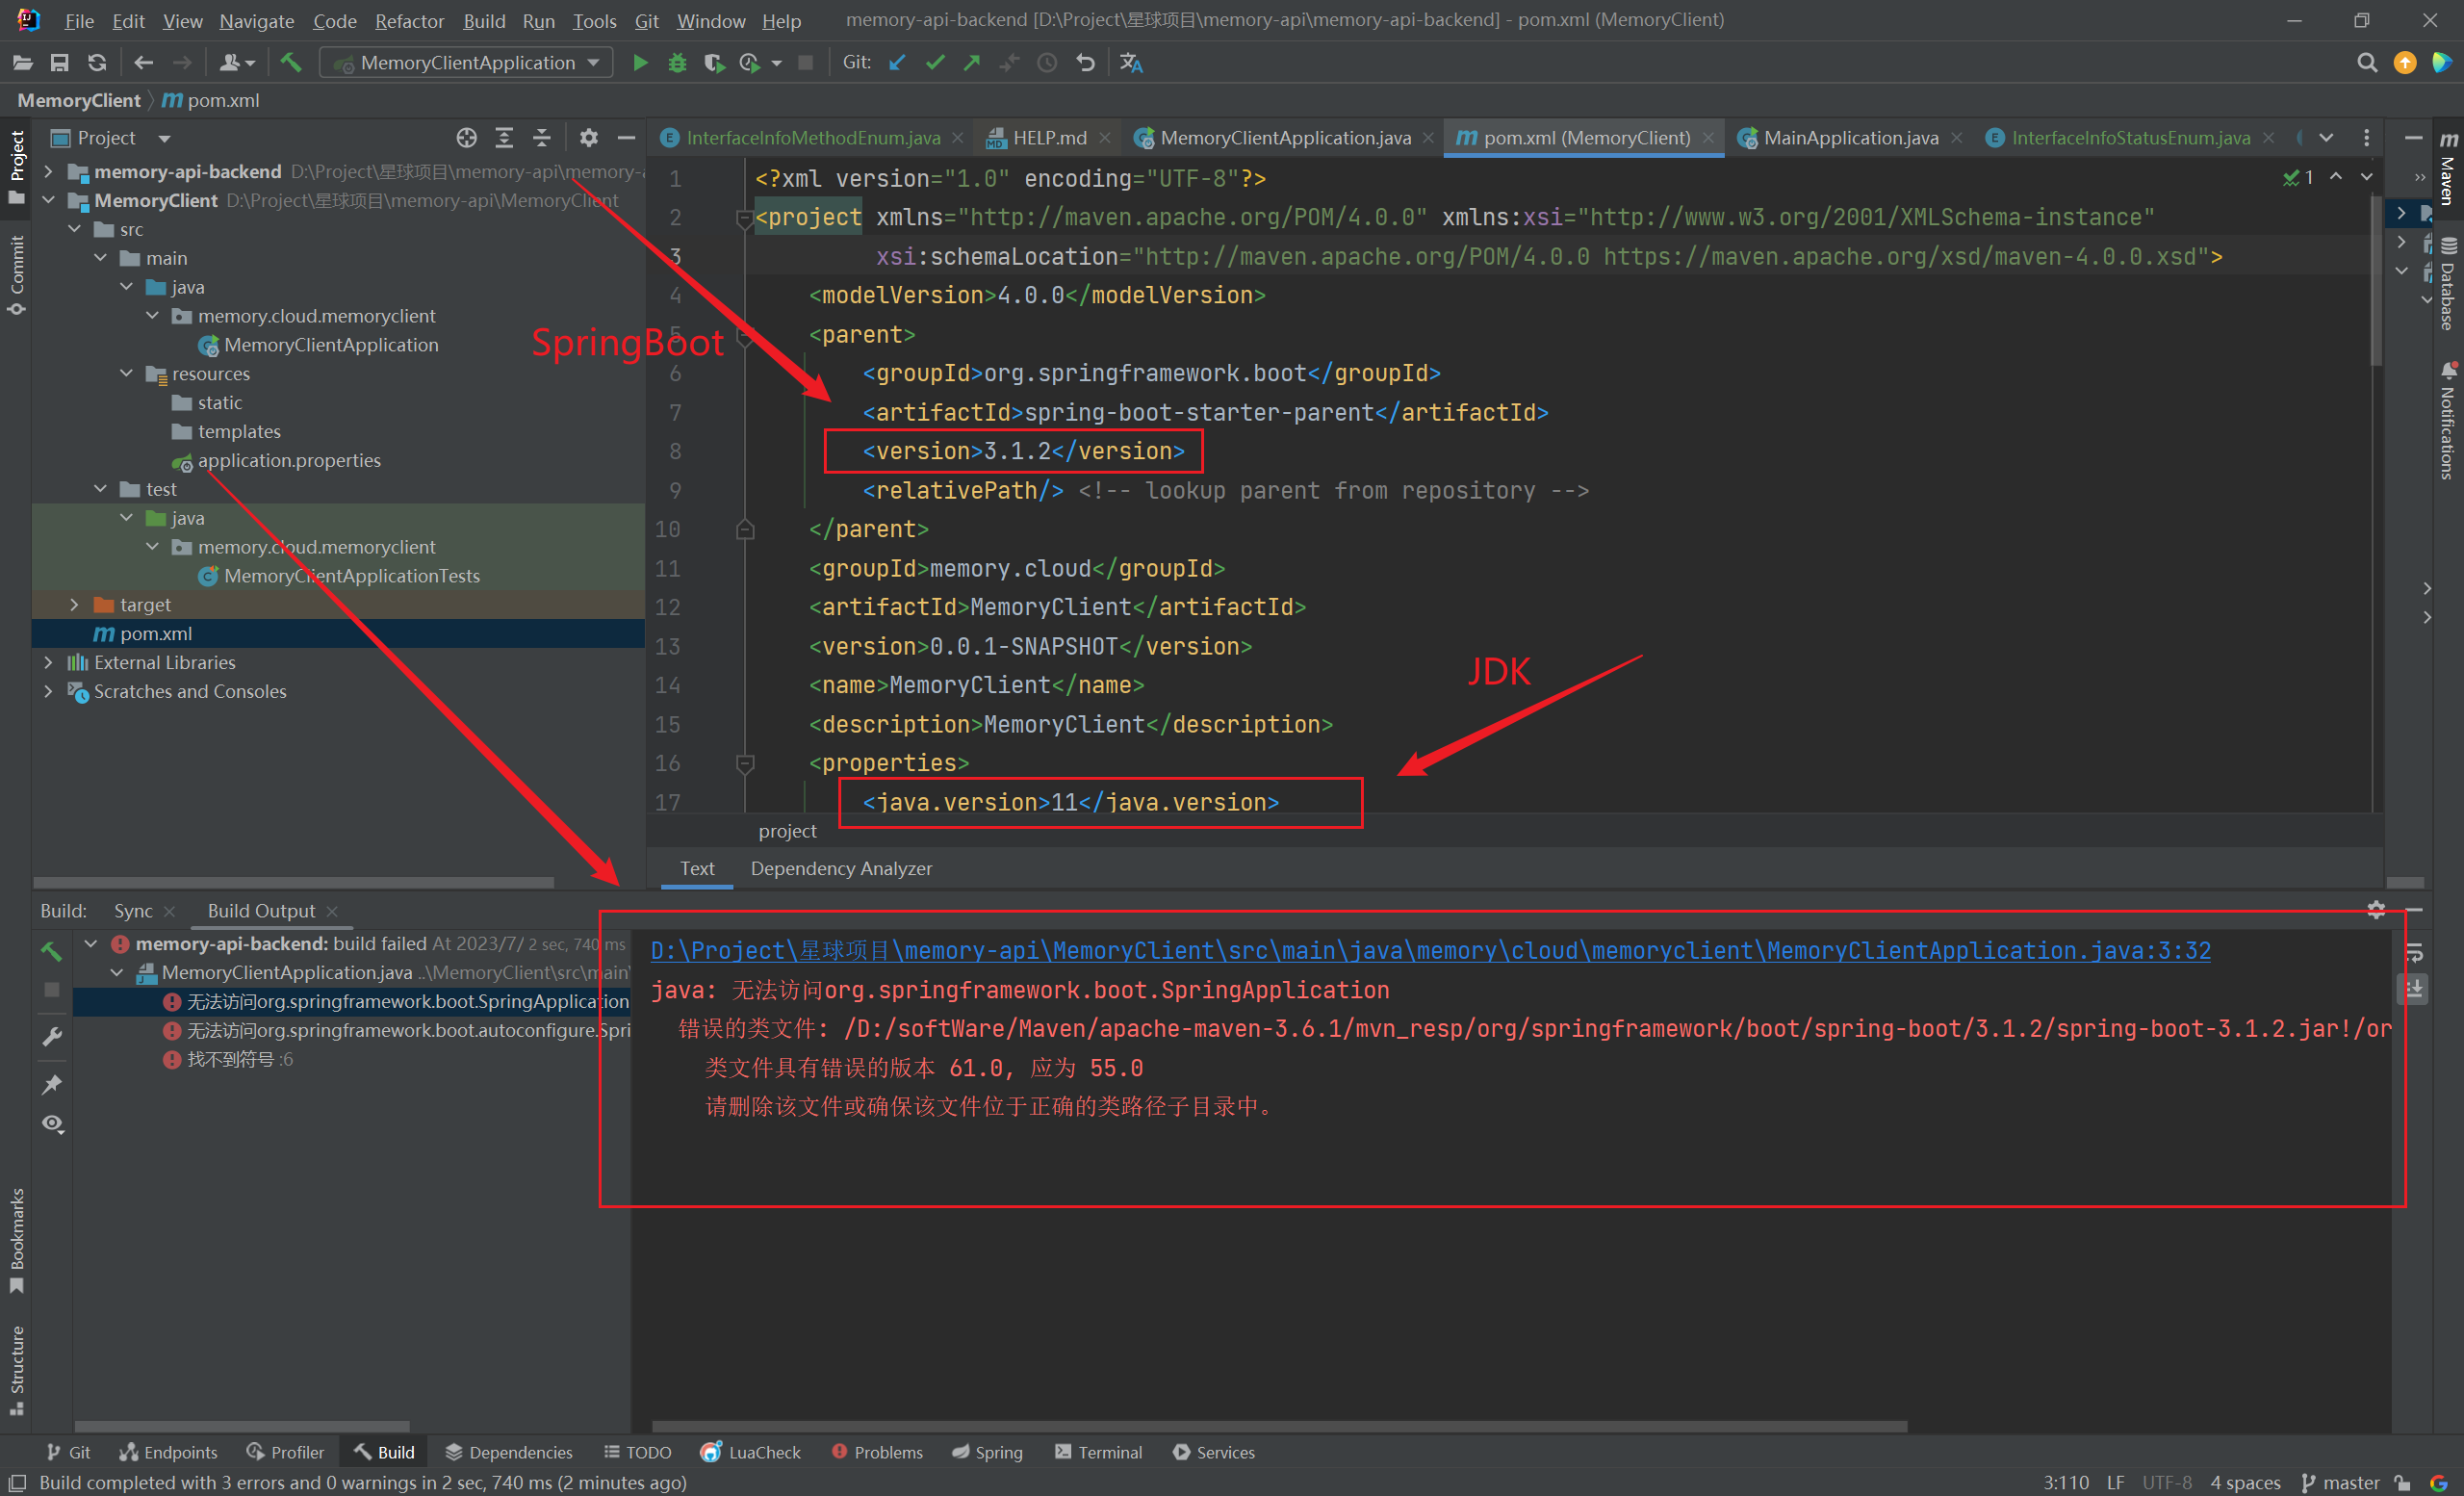
该项目使用的SpringBoot版本为3.1.2,JDK版本为11,
在将SpringBoot版本降为2.7.9后,项目启动成功了(2023/07/28晚)
模拟浏览器发送请求
我们在开发过程中,在后台编写好模拟简单的接口后,总是要在网页上输入对应url,测试该接口能否跑通

然而 IDEA给我们提供了模拟网页请求的功能:(2023/07/28晚)
如图所示:

在该页面下,我们可以快速编写HTTP请求,POST或GET:
1
2
3
4
5
6
7
8
9
10
11
12
13
| GET http://localhost:80/api/item?id=99
Accept: application/json
POST http://localhost:80/api/item
Content-Type: application/x-www-form-urlencoded
id=99&content=new-element
###
POST http://localhost:80/api/item
Content-Type: application/json
{}
|
有关如何正确处理HTTP请求中的参数的问题,日后会更新(2023/08/14午)
这部分内容👆已经在《SpringBoot 配置》中的 SpringMVC 栏目下完成了(2023/10/05晚)
不仅如此,我们还可以在编写完成controller层接口后,模拟浏览器发送请求,快速测试:

这部分的实际运用,可以在《快速启动:开发自己的定制化-Spring-Boot-项目模板》一文中的 快速编写Controller层 栏目中了解到(2023/08/14午)
快速新建demo


快速构建 Spring Boot 项目
- 随着
JDK 21 的发布,IDEA 中的构建 Spring Boot 项目也发生了变化:
- 现在构建新项目,可以看到可选的 JDK 版本只有两个:
JDK 17 和 JDK 21:

- 由于可选的
Spring Boot 版本只有 3.x.x 版本,且 Spring Boot 3 明确宣布只支持 JDK 17 及以上的版本(2023/12/16午)
- 所以新项目如果需要和之前低版本的
Spring Boot 项目合作,就会报错:不支持发行的 17 版本
- 这就需要我们更旧项目的
JDK 版本了:

导入模块
在IDEA中,如何在一个项目中导入一个模块?(2023/08/14早)


定时任务实现
纯手写单线程循环
1
2
3
4
5
6
7
8
9
10
11
12
| public static void timer1() {
new Thread(() -> {
while (true) {
System.out.println("定时任务A 当前时间: " + LocalDateTime.now());
try {
Thread.sleep(1000);
} catch (InterruptedException e) {
throw new RuntimeException(e);
}
}
}).start();
}
|
Timer和他的小伙伴
1
2
3
4
5
6
7
8
9
10
11
12
13
14
15
16
17
18
19
20
| public static void timer2() {
Timer timer = new Timer();
System.out.println("1秒后执行任务A,A完成后,等待1秒开始定时执行任务B,当前时间: " + LocalDateTime.now());
timer.schedule(new TimerTask() {
@Override
public void run() {
System.out.println("定时任务A 当前时间: " + LocalDateTime.now());
}
}, 1000);
timer.schedule(new TimerTask() {
@Override
public void run() {
System.out.println("定时任务B 当前时间: " + LocalDateTime.now());
}
}, 1000, 2000);
}
|
ScheduledExecutorService
1
2
3
4
5
6
7
8
9
10
11
12
13
14
| public static void timer4() {
ScheduledExecutorService scheduledExecutorService = Executors.newSingleThreadScheduledExecutor();
System.out.println("2秒后开始执行任务,此刻时间---" + LocalDateTime.now());
scheduledExecutorService.scheduleAtFixedRate(() -> {
System.out.println("任务开始---" + LocalDateTime.now());
try {
Thread.sleep(2000);
} catch (InterruptedException e) {
e.printStackTrace();
}
System.out.println("任务结束---" + LocalDateTime.now());
}, 2000, 5000, TimeUnit.MILLISECONDS);
}
|
1
2
3
4
5
6
7
8
9
10
11
12
13
14
| public static void timer5() {
ScheduledExecutorService scheduledExecutorService = Executors.newSingleThreadScheduledExecutor();
System.out.println("2秒后开始执行任务,此刻时间---" + LocalDateTime.now());
scheduledExecutorService.scheduleWithFixedDelay(() -> {
System.out.println("任务开始---" + LocalDateTime.now());
try {
Thread.sleep(2000);
} catch (InterruptedException e) {
e.printStackTrace();
}
System.out.println("任务结束---" + LocalDateTime.now());
}, 2000, 4000, TimeUnit.MILLISECONDS);
}
|
DelayQueue 延迟任务
DelayQueue是JDK提供的api,是一个延迟队列
1
2
3
4
5
6
7
8
9
10
11
12
13
14
15
16
17
18
19
20
21
22
| @Slf4j
public class DelayQueueDemo {
public static void main(String[] args) {
DelayQueue<SanYouTask> sanYouTaskDelayQueue = new DelayQueue<>();
new Thread(() -> {
while (true) {
try {
SanYouTask sanYouTask = sanYouTaskDelayQueue.take();
log.info("获取到延迟任务:{}", sanYouTask.getTaskContent());
} catch (Exception e) {
}
}
}).start();
log.info("提交延迟任务");
sanYouTaskDelayQueue.offer(new SanYouTask("三友的java日记5s", 5L));
sanYouTaskDelayQueue.offer(new SanYouTask("三友的java日记3s", 3L));
sanYouTaskDelayQueue.offer(new SanYouTask("三友的java日记8s", 8L));
}
}
|
1
2
3
4
5
6
7
8
9
10
11
12
13
14
15
16
17
18
19
20
21
22
| @Data
public class SanYouTask implements Delayed {
private final String taskContent;
private final Long triggerTime;
public SanYouTask(String taskContent, Long delayTime) {
this.taskContent = taskContent;
this.triggerTime = System.currentTimeMillis() + delayTime * 1000;
}
@Override
public long getDelay(TimeUnit unit) {
return unit.convert(triggerTime - System.currentTimeMillis(), TimeUnit.MILLISECONDS);
}
@Override
public int compareTo(Delayed o) {
return this.triggerTime.compareTo(((SanYouTask) o).triggerTime);
}
}
|
getDelay方法返回这个任务还剩多久时间可以执行,小于0的时候说明可以这个延迟任务到了执行的时间了。compareTo这个是对任务排序的,保证最先到延迟时间的任务排到队列的头。
- taskContent:延迟任务的具体的内容
- delayTime:延迟时间,秒为单位
实现原理
🍻 offer方法在提交任务的时候,会通过根据compareTo的实现对任务进行排序,将最先需要被执行的任务放到队列头。
🍛take方法获取任务的时候,会拿到队列头部的元素,也就是队列中最早需要被执行的任务,通过getDelay返回值判断任务是否需要被立刻执行,如果需要的话,就返回任务,如果不需要就会等待这个任务到延迟时间的剩余时间,当时间到了就会将任务返回。
Spring提供定时任务
1
2
3
4
5
6
7
8
9
10
11
12
13
14
15
|
@EnableScheduling
@Component
public class Timer {
@Scheduled(cron = "*/2 * * * * *")
public void timer() {
System.out.println("哈哈哈哈");
}
}
|
如果有多个定时任务类,可以考虑把@EnableScheduling注解添加在启动类上
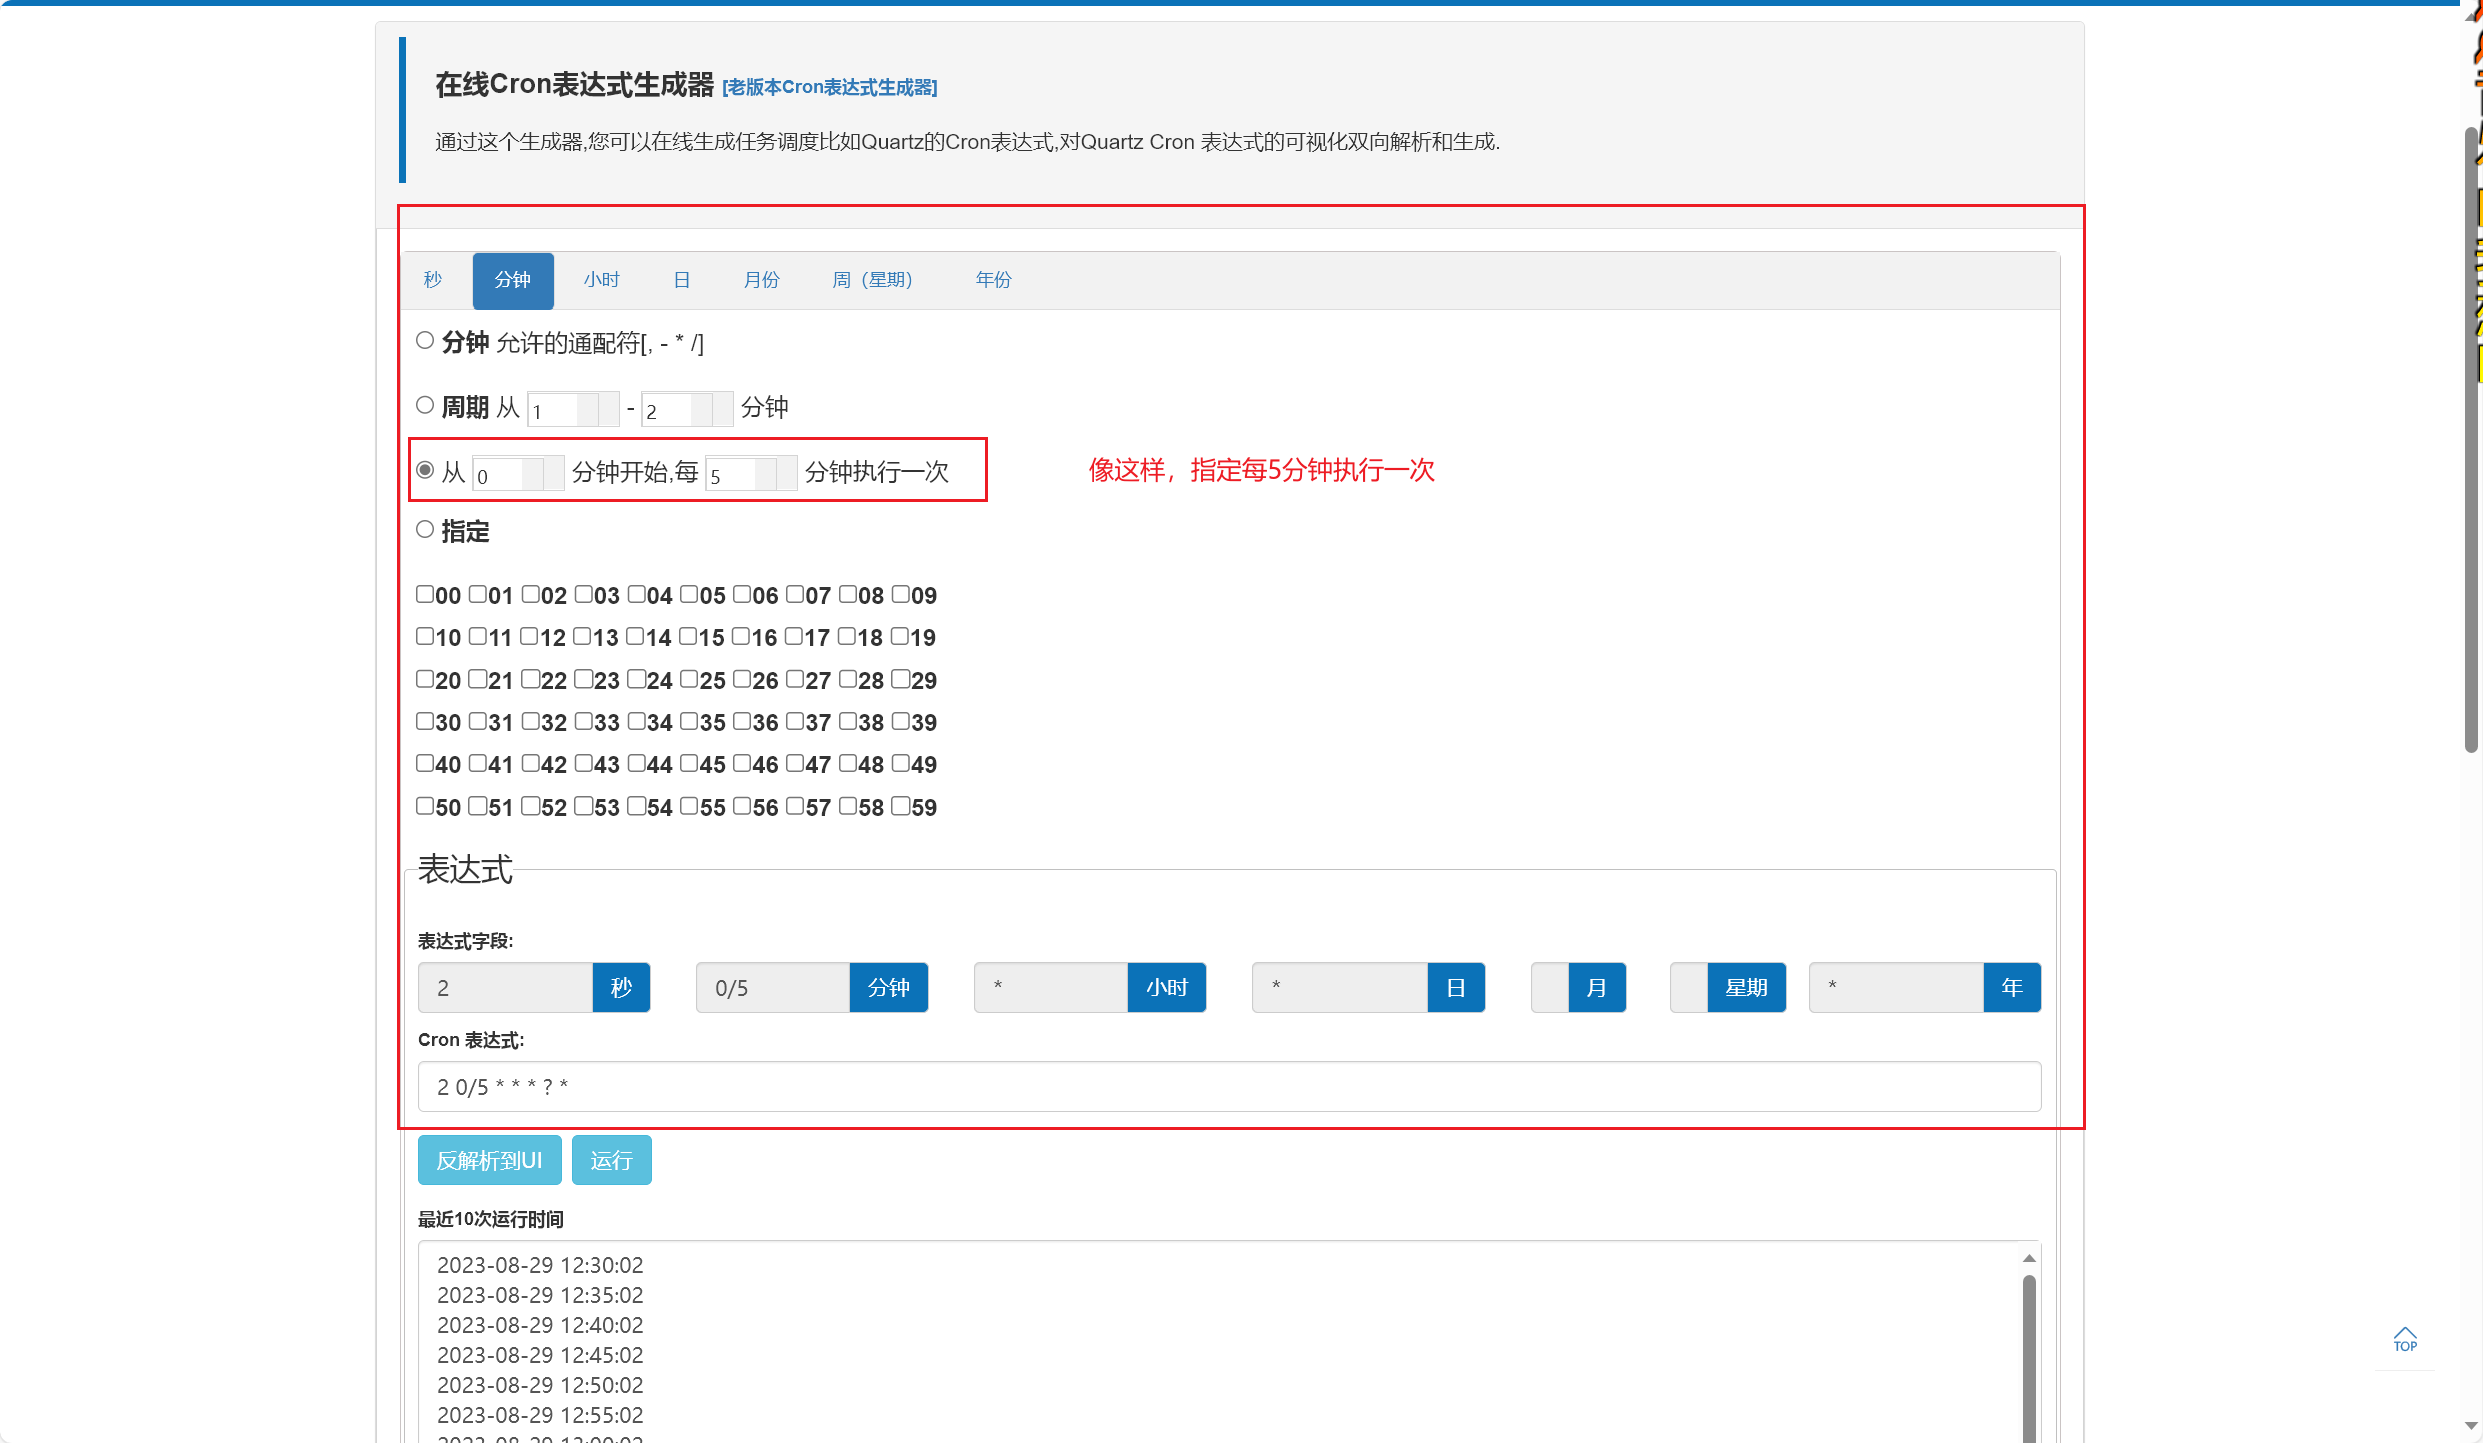
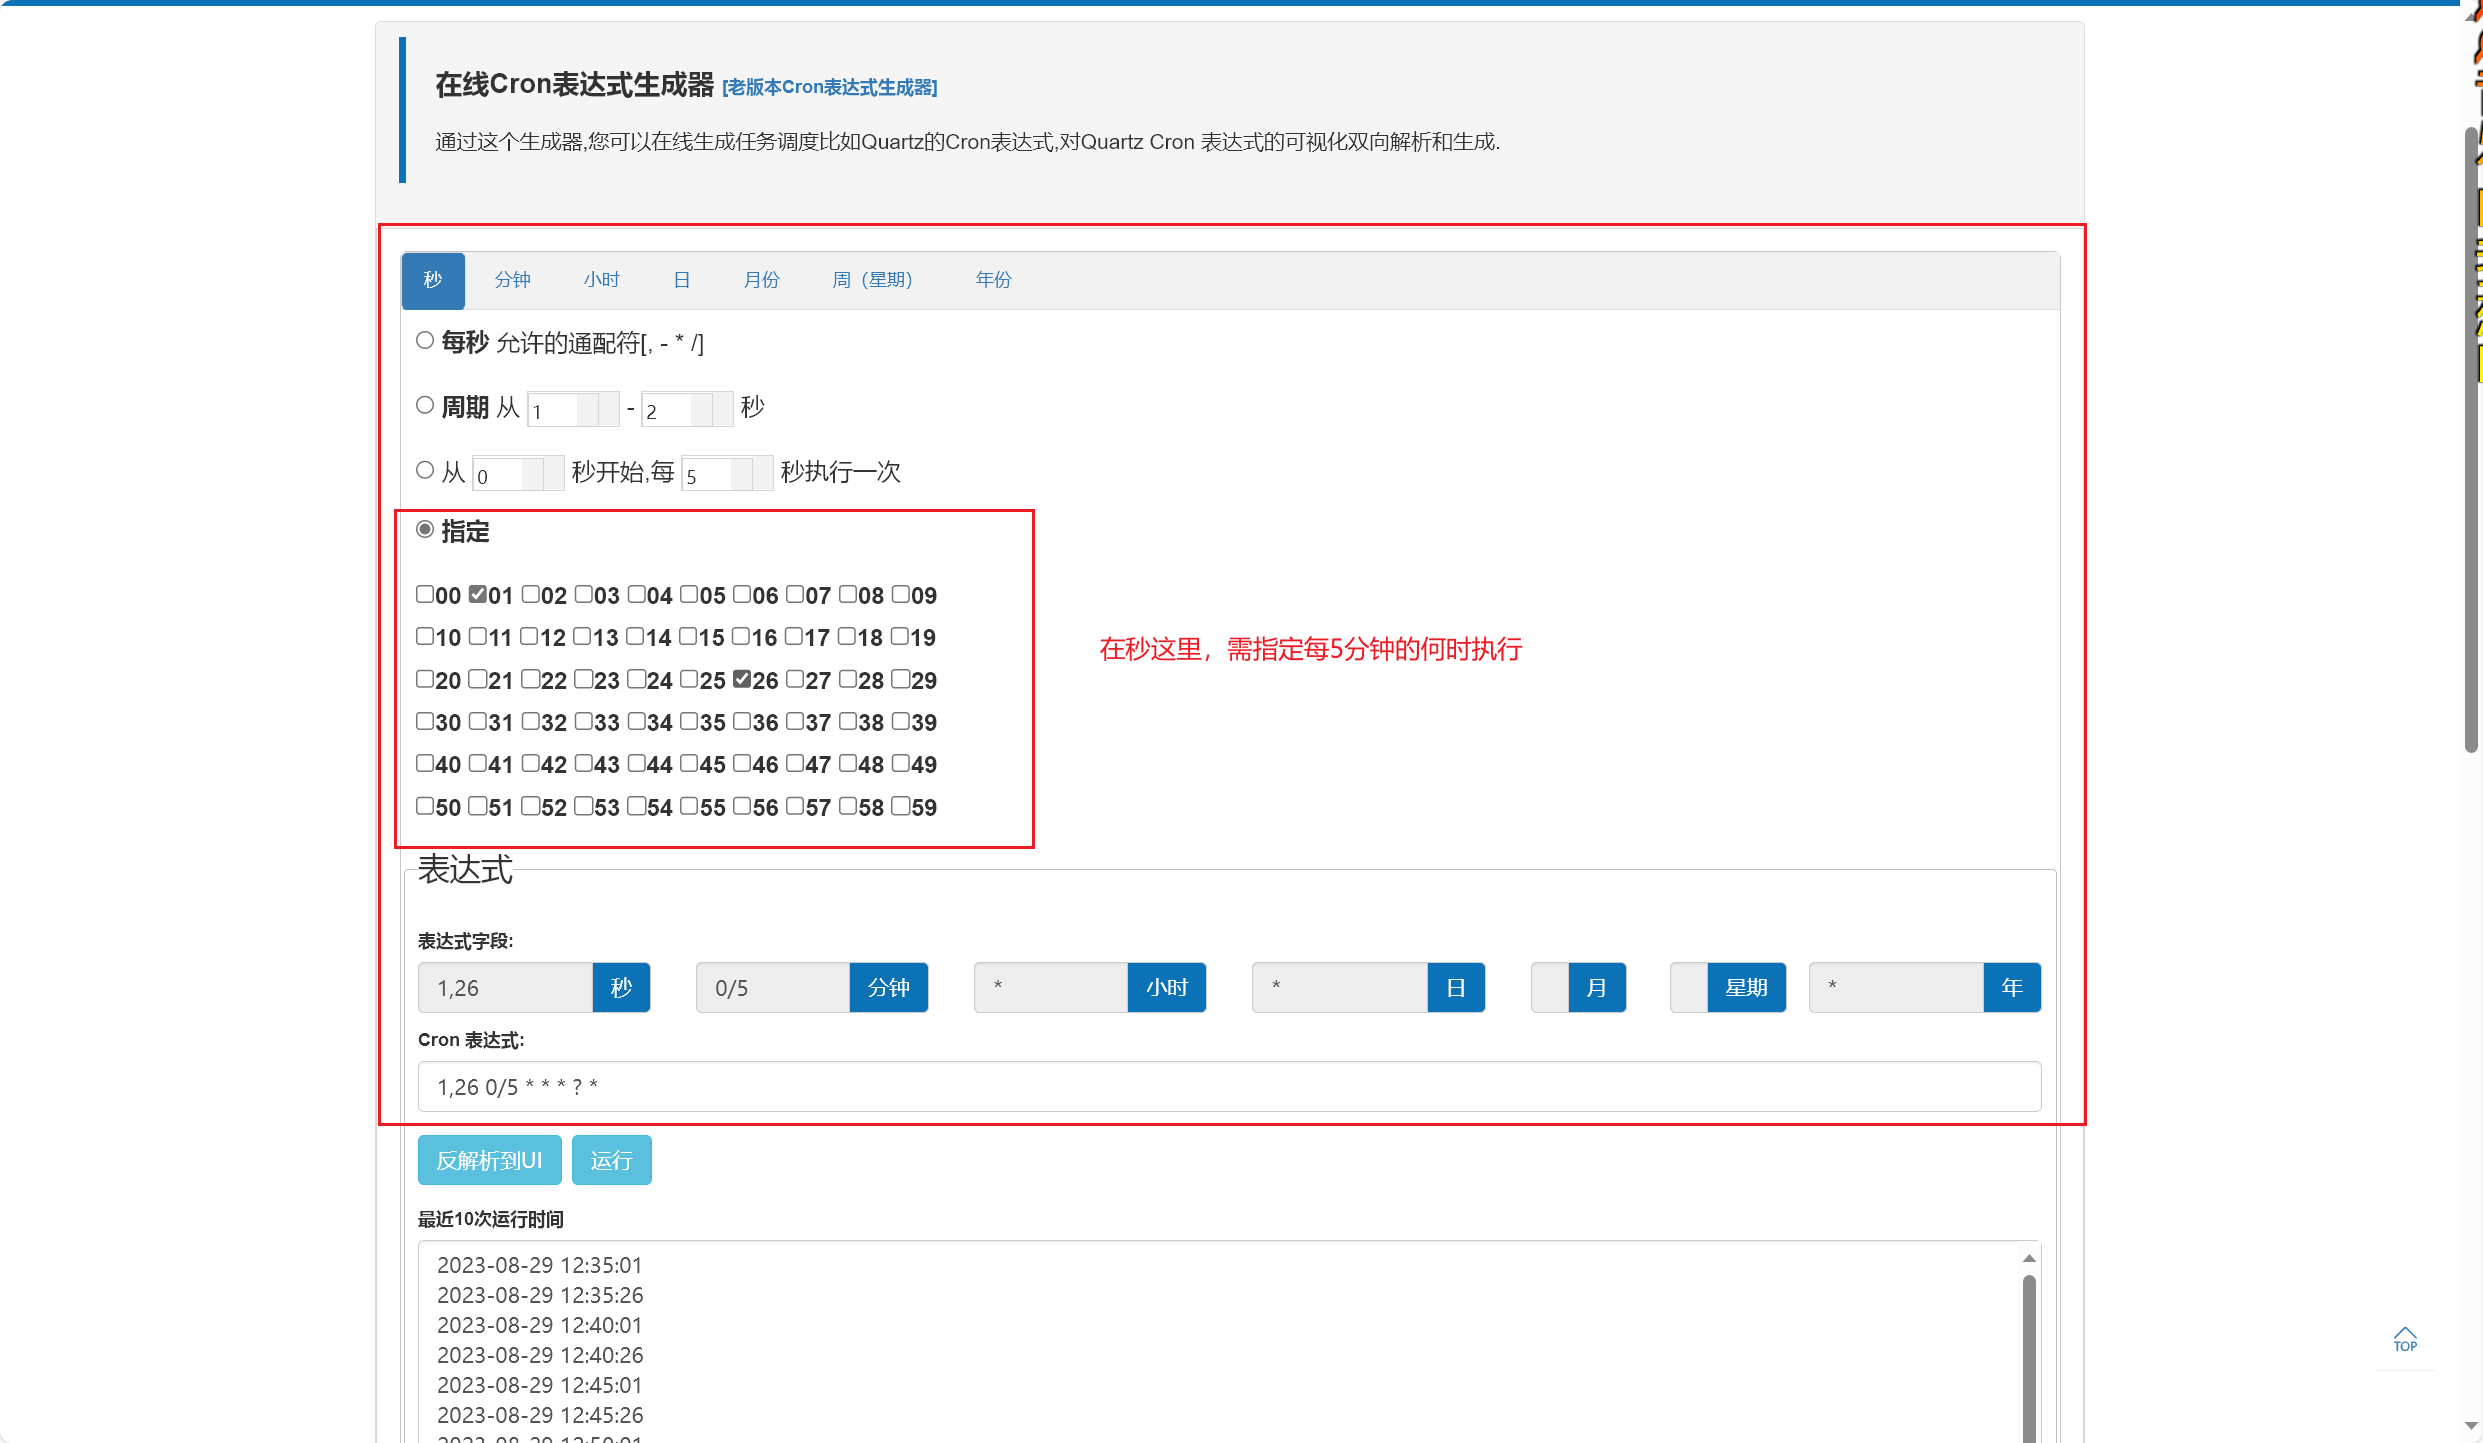
Cron表达式
简单地介绍下如何使用吧:(2023/08/25早)


项目目录显示问题
昨天重构项目之后,项目目录变成了这样,待解决:(2024/01/19午)

解决了,取消这个显示就行了:

设置技巧
注释对齐
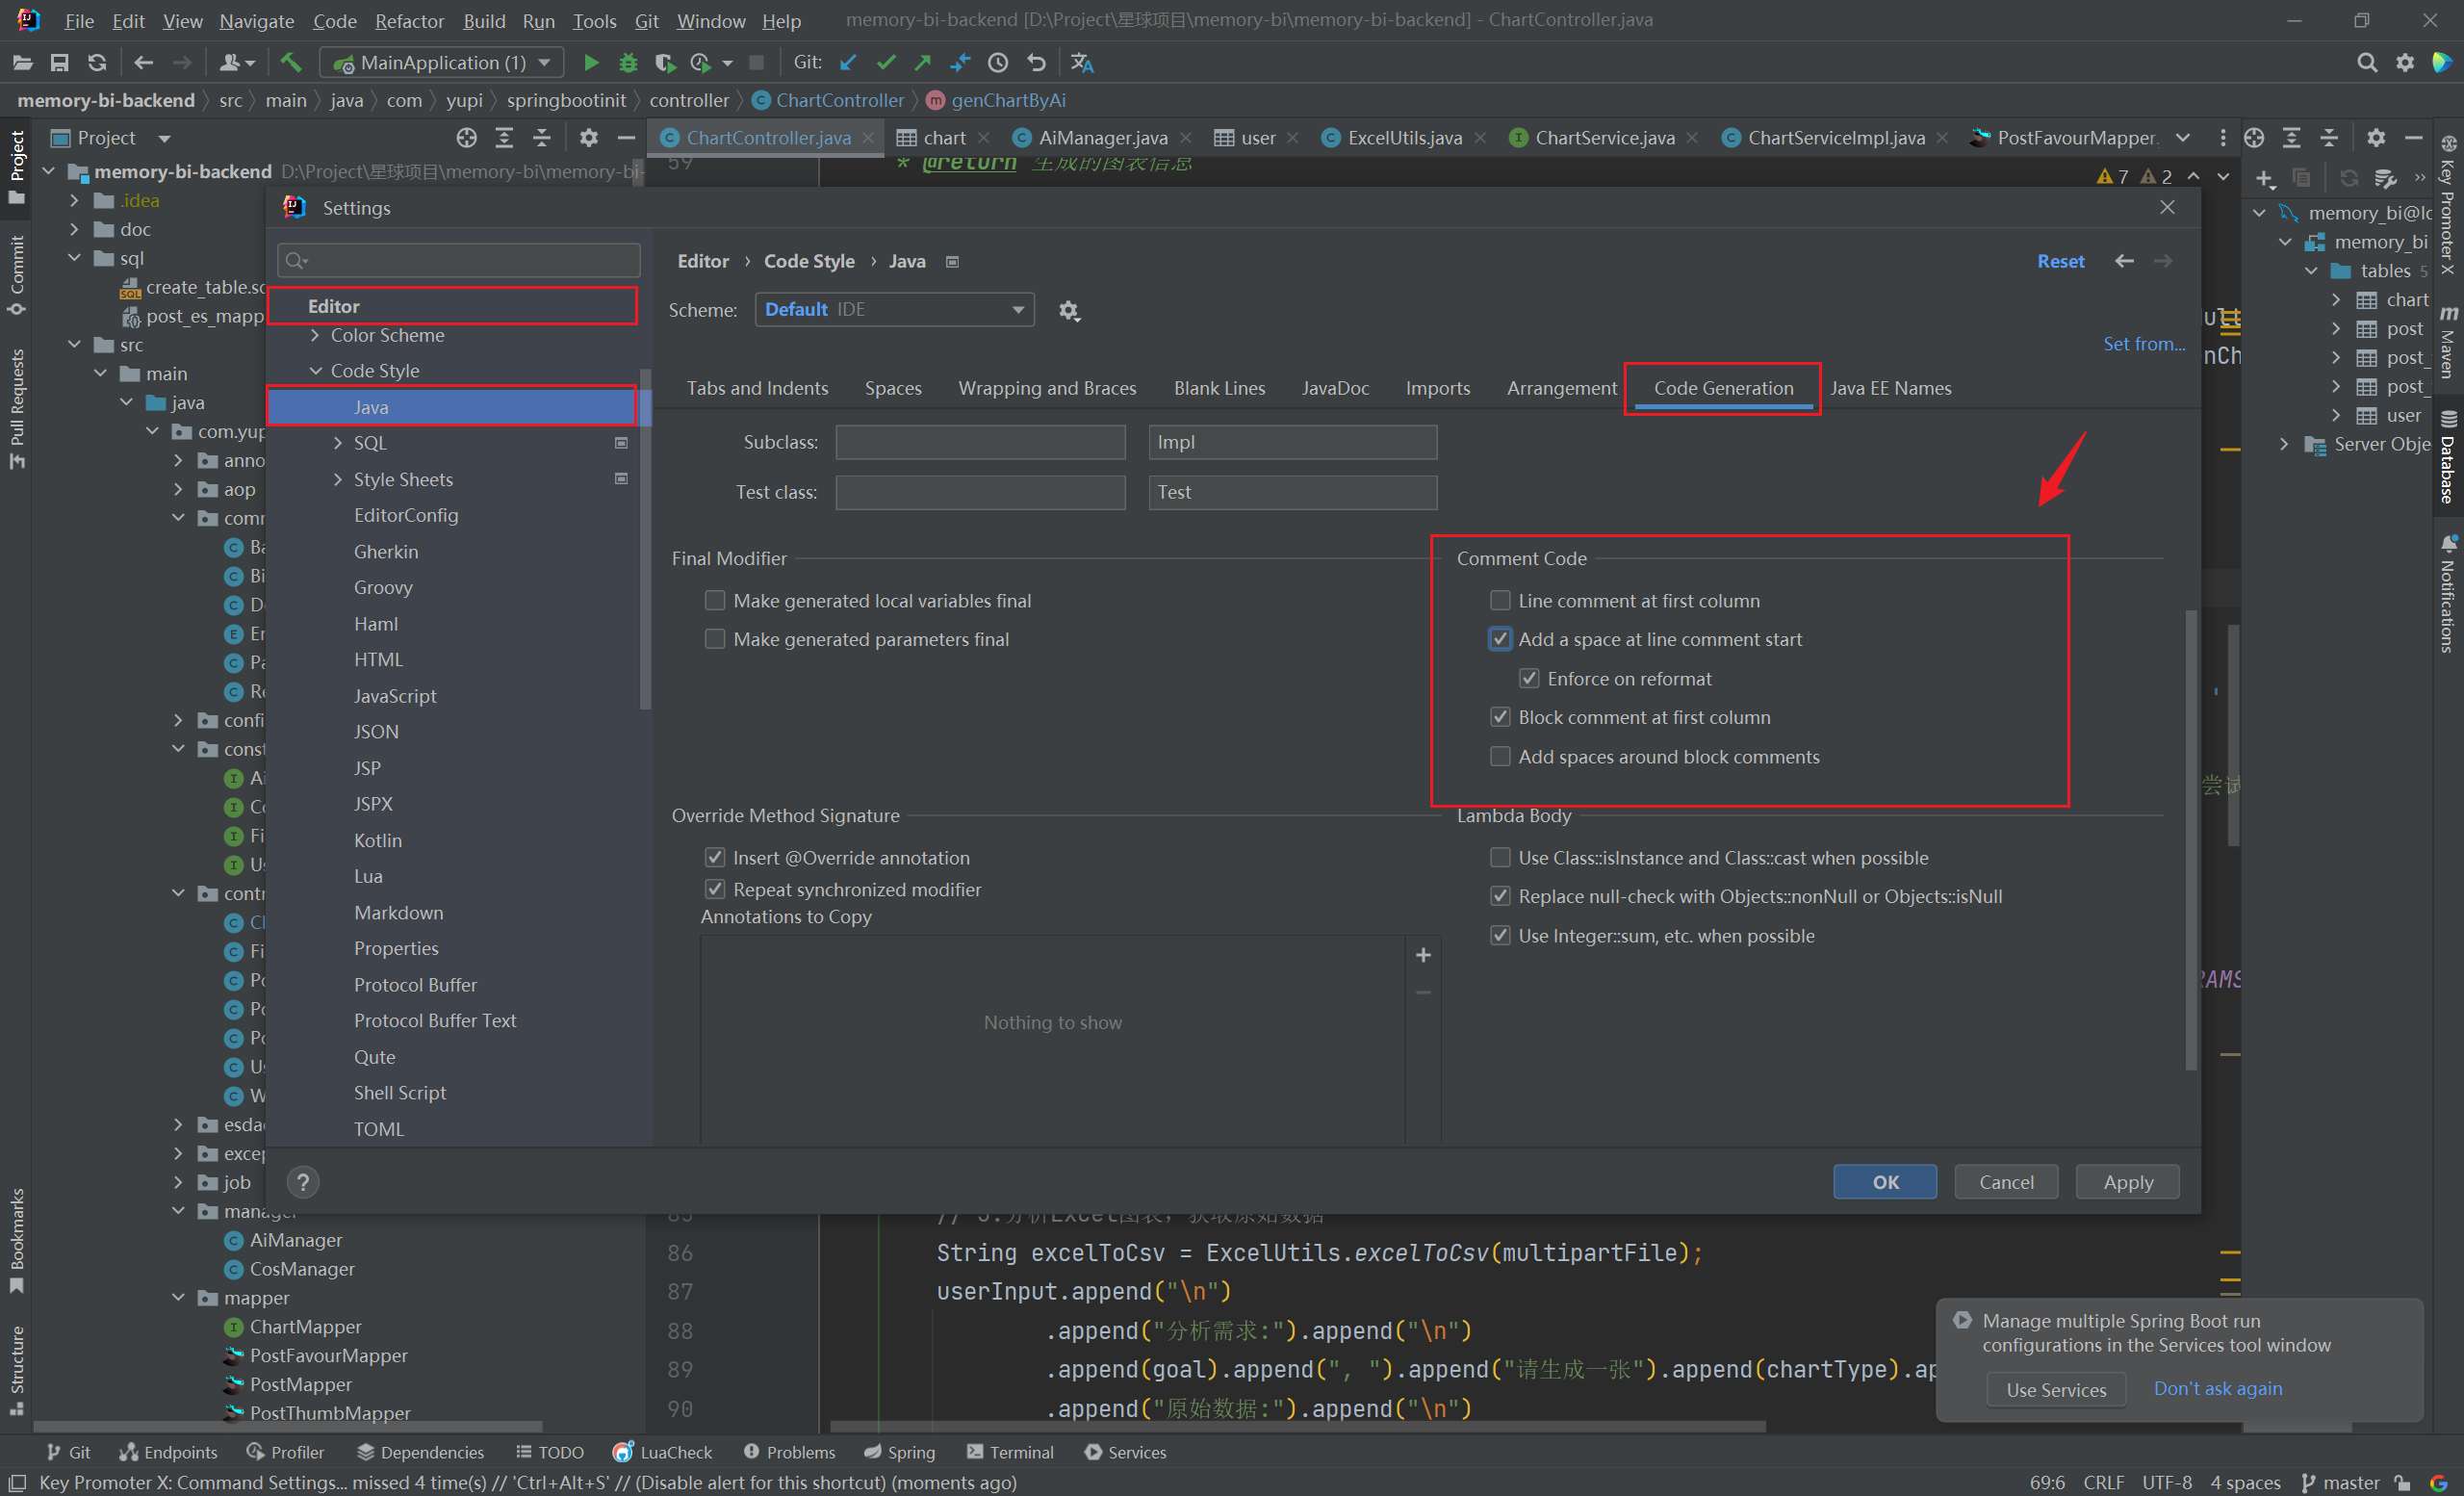

- 按 Ctrl + / 快捷键,就是这样的效果:(2023/10/08早)

Java基础
本人太菜,不定时巩固Java基础,今天巩固如下操作:(2023/08/14早)
1
2
3
4
5
6
7
|
Random random = new Random();
ArrayList<Double> arrayList = new ArrayList<>();
long startTime = System.currentTimeMillis();
for (int i = 0; i < 100000; i++) {
arrayList.add(random.nextDouble());
}
|
1
2
3
4
5
6
7
8
9
10
11
12
13
14
|
Collections.sort(arrayList, new Comparator<Double>() {
@Override
public int compare(Double o1, Double o2) {
return o1.compareTo(o2);
}
});
Collections.sort(arrayList, (o1, o2) -> {
return o1.compareTo(o2);
});
Collections.sort(arrayList, (o1, o2) -> o1.compareTo(o2));
|
1
2
3
4
5
6
7
8
9
|
arrayList.forEach(item -> {
System.out.println(item);
});
arrayList.stream().forEach(item -> System.out.println(item));
}
|
1
2
3
4
5
6
7
8
9
10
11
12
13
14
15
16
17
| List<Integer> userList = new ArrayList<>();
Random rand = new Random();
for (int i = 0; i < 10000; i++) {
userList.add(rand.nextInt(1000));
}
List<Integer> userList2 = new ArrayList<>();
userList2.addAll(userList);
Long startTime1 = System.currentTimeMillis();
userList2.stream().sorted(Comparator.comparing(Integer::intValue)).collect(Collectors.toList());
System.out.println("stream.sort耗时:" + (System.currentTimeMillis() - startTime1) + "ms");
Long startTime = System.currentTimeMillis();
userList.sort(Comparator.comparing(Integer::intValue));
System.out.println("List.sort()耗时:" + (System.currentTimeMillis() - startTime) + "ms");
|
Date/Time API
1
2
3
4
5
6
7
8
9
10
11
12
| static void test() {
LocalDateTime dateTime = LocalDateTime.now();
System.out.println(dateTime);
DateTimeFormatter pattern = DateTimeFormatter.ofPattern("yyyy-MM-dd HH:mm:ss");
String format = dateTime.format(pattern);
System.out.println(format);
String now = LocalDateTime.now().format(DateTimeFormatter.ofPattern("yyyy年MM月dd日 HH时mm分ss秒"));
System.out.println(now);
}
|
1
2
3
4
5
6
7
| static void test2() {
Duration between = Duration.between(LocalDate.of(2022, Month.JULY, 10), LocalDate.now());
System.out.println(between);
Duration between1 = Duration.between(LocalTime.of(12, 29, 10), LocalDate.now());
System.out.println(between1);
}
|
Optional 容器类型
ofNullable() 方法:创建一个可能包含 null 值的 Optional 对象(2023/08/18午)
isPresent() 方法:判断 Optional 中是否存在值。返回ture表示存在值 返回false表示为null
get() 方法:如果 Optional 的值存在则返回该值,否则抛出 NoSuchElementException 异常。
1
2
3
4
5
6
7
8
9
| static void test3() {
Optional<String> optional = Optional.of("hhh");
if (optional.isPresent()) {
System.out.println(optional.get());
}
Optional.of("hhh").ifPresent(System.out::println);
}
|
1
2
3
| static void test4(User user) {
Optional.ofNullable(user).map(User::getName).ifPresentOrElse(out::println, user != null ? user.setName("ccc") : null);
}
|
BigDecimal
1
2
3
4
5
6
7
8
9
10
11
12
13
14
15
16
17
18
19
20
21
22
23
24
25
26
27
28
29
30
31
32
| static void test5() {
BigDecimal dec1 = new BigDecimal("1.3");
BigDecimal dec2 = new BigDecimal("1.3");
BigDecimal add = dec1.add(dec2);
BigDecimal subtract = dec1.subtract(dec2);
BigDecimal multiply = dec1.multiply(dec2);
BigDecimal divide = dec1.divide(dec2).setScale(3, RoundingMode.HALF_DOWN);
out.println(add);
out.println(subtract);
out.println(multiply);
System.out.println(divide);
BigDecimal bigDecimal = divide.stripTrailingZeros();
out.println(bigDecimal);
BigDecimal value = new BigDecimal("1888977466432.1241341341413414");
double doubleValue = value.doubleValue();
out.println(doubleValue);
double doubleValue1 = value.toBigInteger().doubleValue();
out.println(doubleValue1);
out.println(add.compareTo(subtract) > 0 ? "add大于sub" : "add小于sub");
}
|
数组转字符串
1
2
3
4
|
List<String> list = Arrays.asList("Apple", "Banana", "Cherry", "Date", "Elderberry");
String[] arr = {"0", "1", "2", "3", "4", "5"};
|
如果是List,则有如下转字符串的方法:(2023/09/20晚)
1
2
|
String collect = list.stream().collect(Collectors.joining(","));
|
1
2
|
String join = StringUtils.join(longList, ",");
|
1
2
3
4
5
6
7
8
|
StringBuilder sb = new StringBuilder();
for (int i = 0; i < list.size(); i++) {
sb.append(i);
if (i < list.size() - 1) {
sb.append(",");
}
}
|
1
2
|
String join = String.join(",", list);
|
以上方法,转换所消耗的时间越来越少,效率越来越高
如果是String[],则有如下转字符串的方法:(2023/09/20晚)
1
2
|
String join = StringUtils.join(longList, ",");
|
1
2
|
String join = String.join(",", list);
|
Java8中的Map函数
computeIfAbsent
- 如果指定的key不存在于Map中,那么会执行指定的函数来计算并将结果作为value放入到Map中。
- 如果指定的key已经存在于Map中,则不会执行计算函数,而是直接返回已存在的value。
1
2
3
4
5
6
7
8
9
10
11
12
13
14
15
16
17
18
19
20
21
22
23
24
| import java.util.HashMap;
import java.util.Map;
public class ComputeIfAbsentExample {
public static void main(String[] args) {
Map<String, Integer> map = new HashMap<>();
map.put("apple", 1);
map.put("banana", 2);
map.computeIfAbsent("orange", key -> {
System.out.println("Performing computation for orange");
return key.length();
});
map.computeIfAbsent("apple", key -> {
System.out.println("Performing computation for apple");
return key.length();
});
System.out.println(map);
}
}
|
computeIfPresent
- 如果指定的key存在于Map中,那么会执行指定的函数来计算并将结果作为新的value放入到Map中。
- 如果指定的key不存在于Map中,则不会执行计算函数,什么也不做
1
2
3
4
5
6
7
8
9
10
11
12
13
14
15
| import java.util.HashMap;
import java.util.Map;
public class ComputeIfPresentExample {
public static void main(String[] args) {
Map<String, Integer> map = new HashMap<>();
map.put("apple", 1);
map.put("banana", 2);
map.computeIfPresent("apple", (key, value) -> value * 2);
map.computeIfPresent("orange", (key, value) -> value * 2);
System.out.println(map);
}
}
|
compute
- 而
compute()函数无论旧的value是否为null,都会调用计算函数来计算新的value,并将计算结果更新到Map中。
- 如果计算结果为
null,则会将对应的key从Map中移除。
1
2
3
4
5
6
7
8
9
10
11
12
13
14
15
16
17
18
19
20
| import java.util.HashMap;
import java.util.Map;
public class ComputeExample {
public static void main(String[] args) {
Map<String, Integer> map = new HashMap<>();
map.put("apple", 1);
map.put("banana", null);
map.computeIfPresent("apple", (key, value) -> value * 2);
map.computeIfPresent("banana", (key, value) -> value * 2);
System.out.println(map);
map.compute("apple", (key, value) -> value + 3);
map.compute("banana", (key, value) -> value + 3);
System.out.println(map);
}
}
|
merge
1
2
3
4
5
6
7
8
9
10
11
12
13
14
15
16
17
18
19
20
| import java.util.HashMap;
import java.util.Map;
public class MergeExample {
public static void main(String[] args) {
Map<String, Integer> map1 = new HashMap<>();
map1.put("apple", 1);
map1.put("banana", 2);
Map<String, Integer> map2 = new HashMap<>();
map2.put("apple", 5);
map2.put("orange", 3);
map2.forEach((key, value) -> {
map1.merge(key, value, (oldValue, newValue) -> oldValue + newValue);
});
System.out.println(map1); // 输出: {orange=3, apple=6, banana=2}
}
}
|
getOrDefalut
- 当 key 存在时,取对应 value,否则取默认值
1
2
3
4
5
6
7
8
9
10
11
12
13
14
15
16
| public static int firstUniqChar(String s) {
if (s == null || s.length() == 0) {
return 0;
}
Map<Character, Integer> frequency = new HashMap<Character, Integer>();
for (int i = 0; i < s.length(); ++i) {
char ch = s.charAt(i);
frequency.put(ch, frequency.getOrDefault(ch, 0) + 1);
}
for (int i = 0; i < s.length(); ++i) {
if (frequency.get(s.charAt(i)) == 1) {
return i;
}
}
return -1;
}
|
putIfAbsent
- 与 put 的区别:如果有重复 key,保存的是最早存入的键值对 (2023/10/08早)
forEach
Java8中的Stream流函数
groupingBy
- 将集合中的元素,按某个属性进行分组,返回的结果是一个 Map 集合 (2023/10/08早)
1
2
3
4
5
6
7
8
9
| public class Person {
private int age;
private String name;
public Person(int age, String name) {
this.age = age;
this.name = name;
}
}
|
1
2
3
4
5
6
7
8
9
10
11
12
13
14
15
| public class GroupingByExample {
public static void main(String[] args) {
List<Person> people = new ArrayList<>();
people.add(new Person(25, "Alice"));
people.add(new Person(30, "Bob"));
people.add(new Person(25, "Charlie"));
people.add(new Person(40, "David"));
people.add(new Person(30, "Emily"));
Map<Integer, List<Person>> groups = people.stream()
.collect(Collectors.groupingBy(Person::getAge));
System.out.println(groups);
}
}
|
泛型理解
学习Java泛型:(2023/10/13晚)
- 泛型类
- 泛型接口
- 泛型方法:返回值、入参位置、方法体中
- 个人感受:泛型很好理解:我们经常讲到一个对象实例的就是以类作为模板创建的,那么也可以讲一个普通类可以以泛型类作为模板;那么泛型是用来干嘛的呢,我们为什么要使用泛型呢?其实,所有的泛型类在编译后生成的字节码与普通类无异,因为在编译前,所有泛型类型就被擦除了。所以我们可以把泛型看作一个语法糖,将类型转换的校验提前在编译时,减少类型转换错误的发生,使编写的程序更加具有健壮性。
我觉得以下这段总结更妙:
泛型是Java语言中的一项强大的特性,它允许在编译时指定类、接口或方法的参数类型,从而在编译阶段就能够进行类型检查。这样可以减少类型转换的错误,并提高代码的安全性和可读性。
通过使用泛型,我们可以在编译时捕捉到一些类型错误,而不是在运行时才发现,这样可以避免一些潜在的bug。泛型还可以增加代码的可重用性和灵活性,因为泛型类、接口和方法可以用于多种不同的类型,而无需针对每一种类型单独编写或重复编写相似的代码。
总的来说,通过使用泛型,我们可以在编写Java代码时更好地约束和使用类型信息,减少类型错误,提高代码的可读性和健壮性。
了解泛型的实现原理,理解泛型的使用方式,更加加深了我们对 Java 语言的理解
良心插件
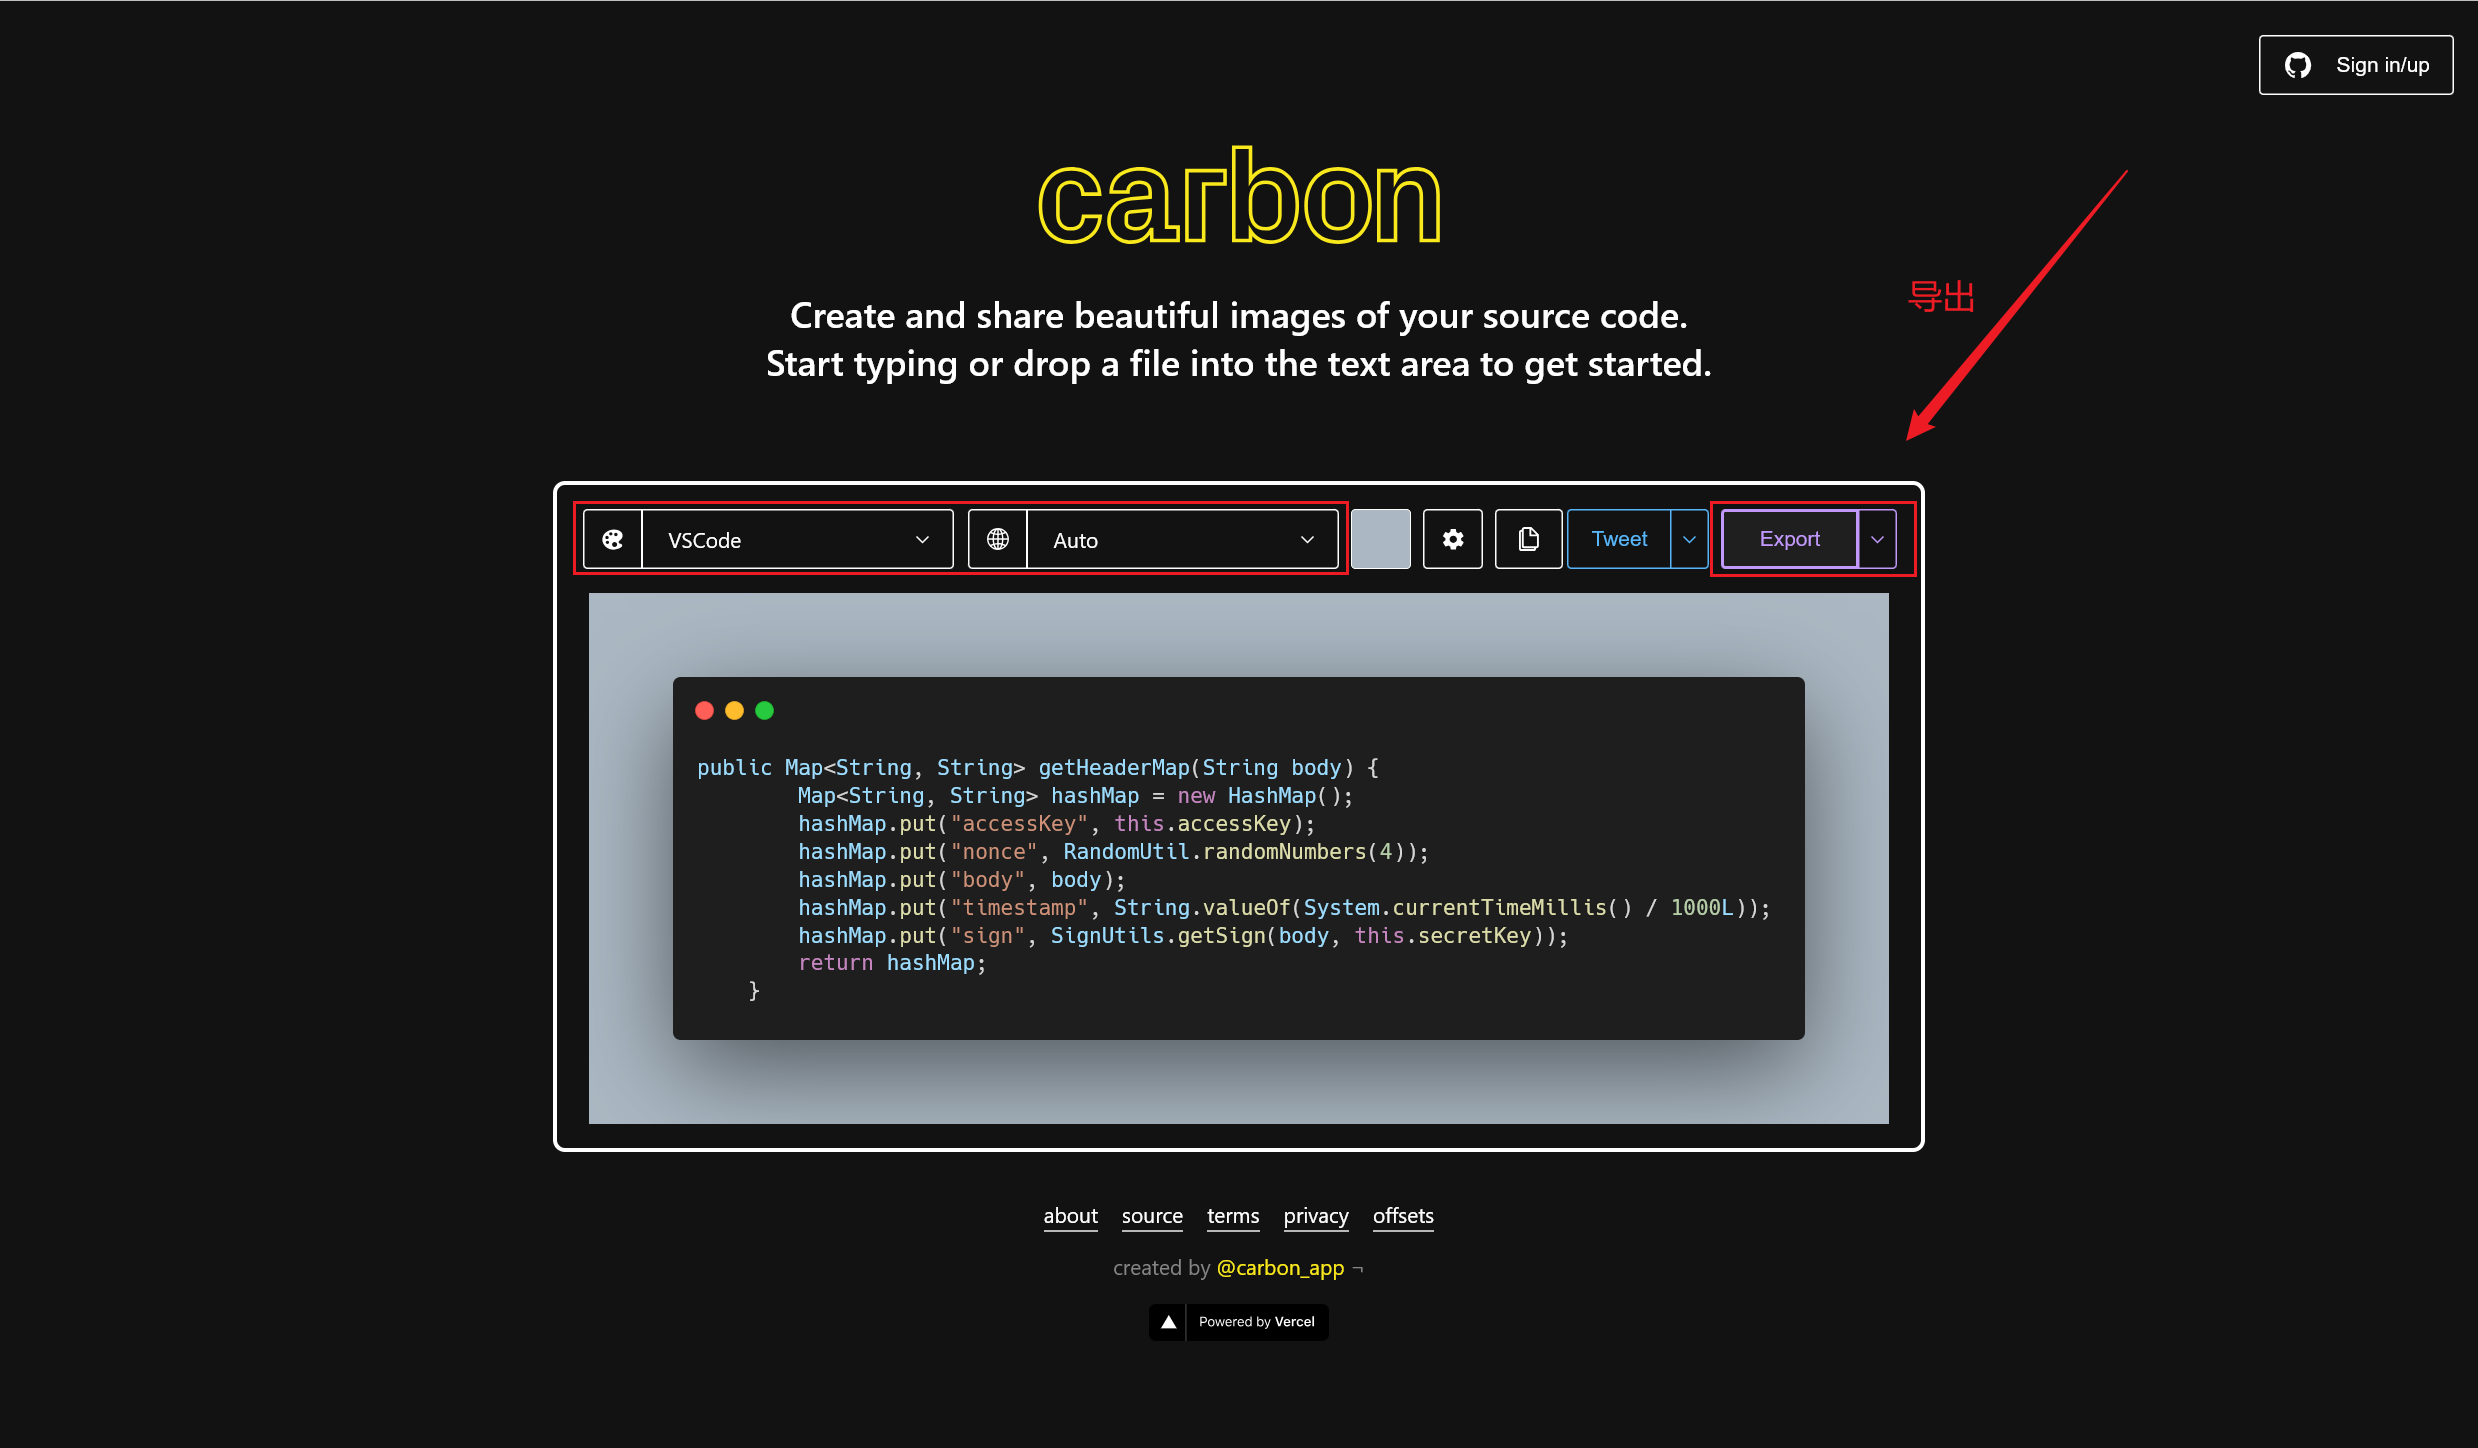
carbon-now-sh
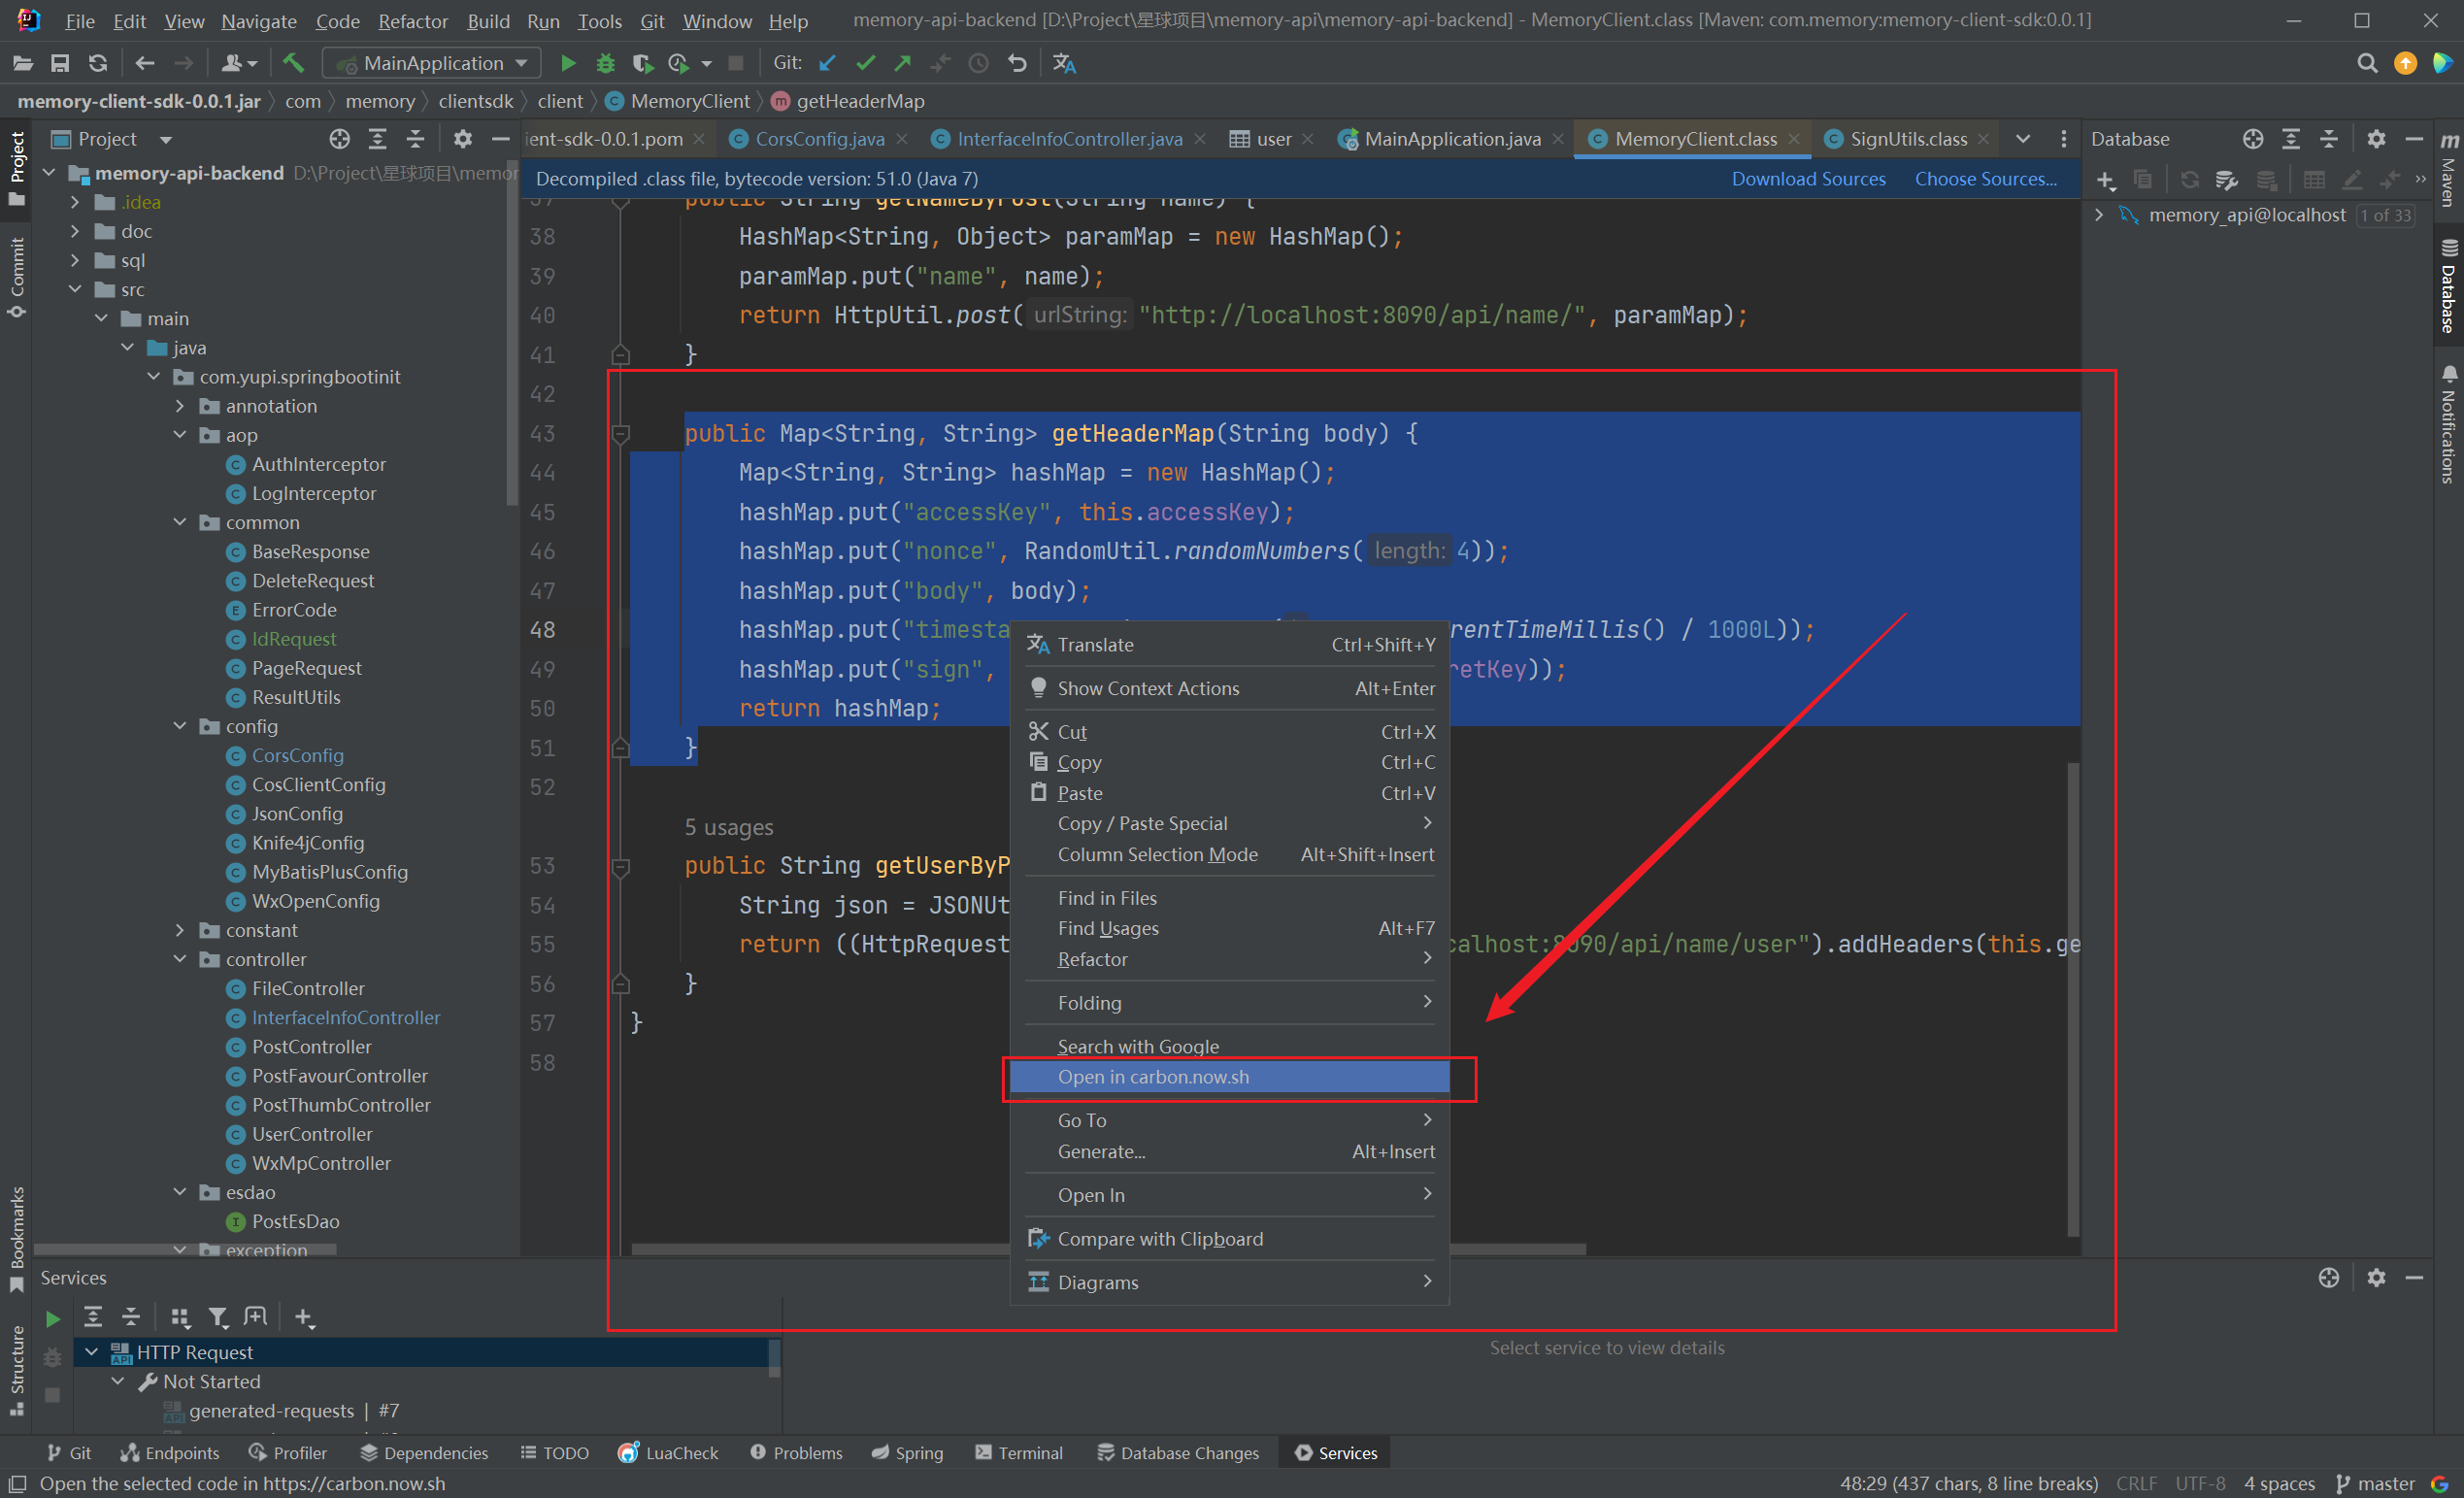
在弹出的网页页面中,可以调整代码风格,点击导出就下载成功了~
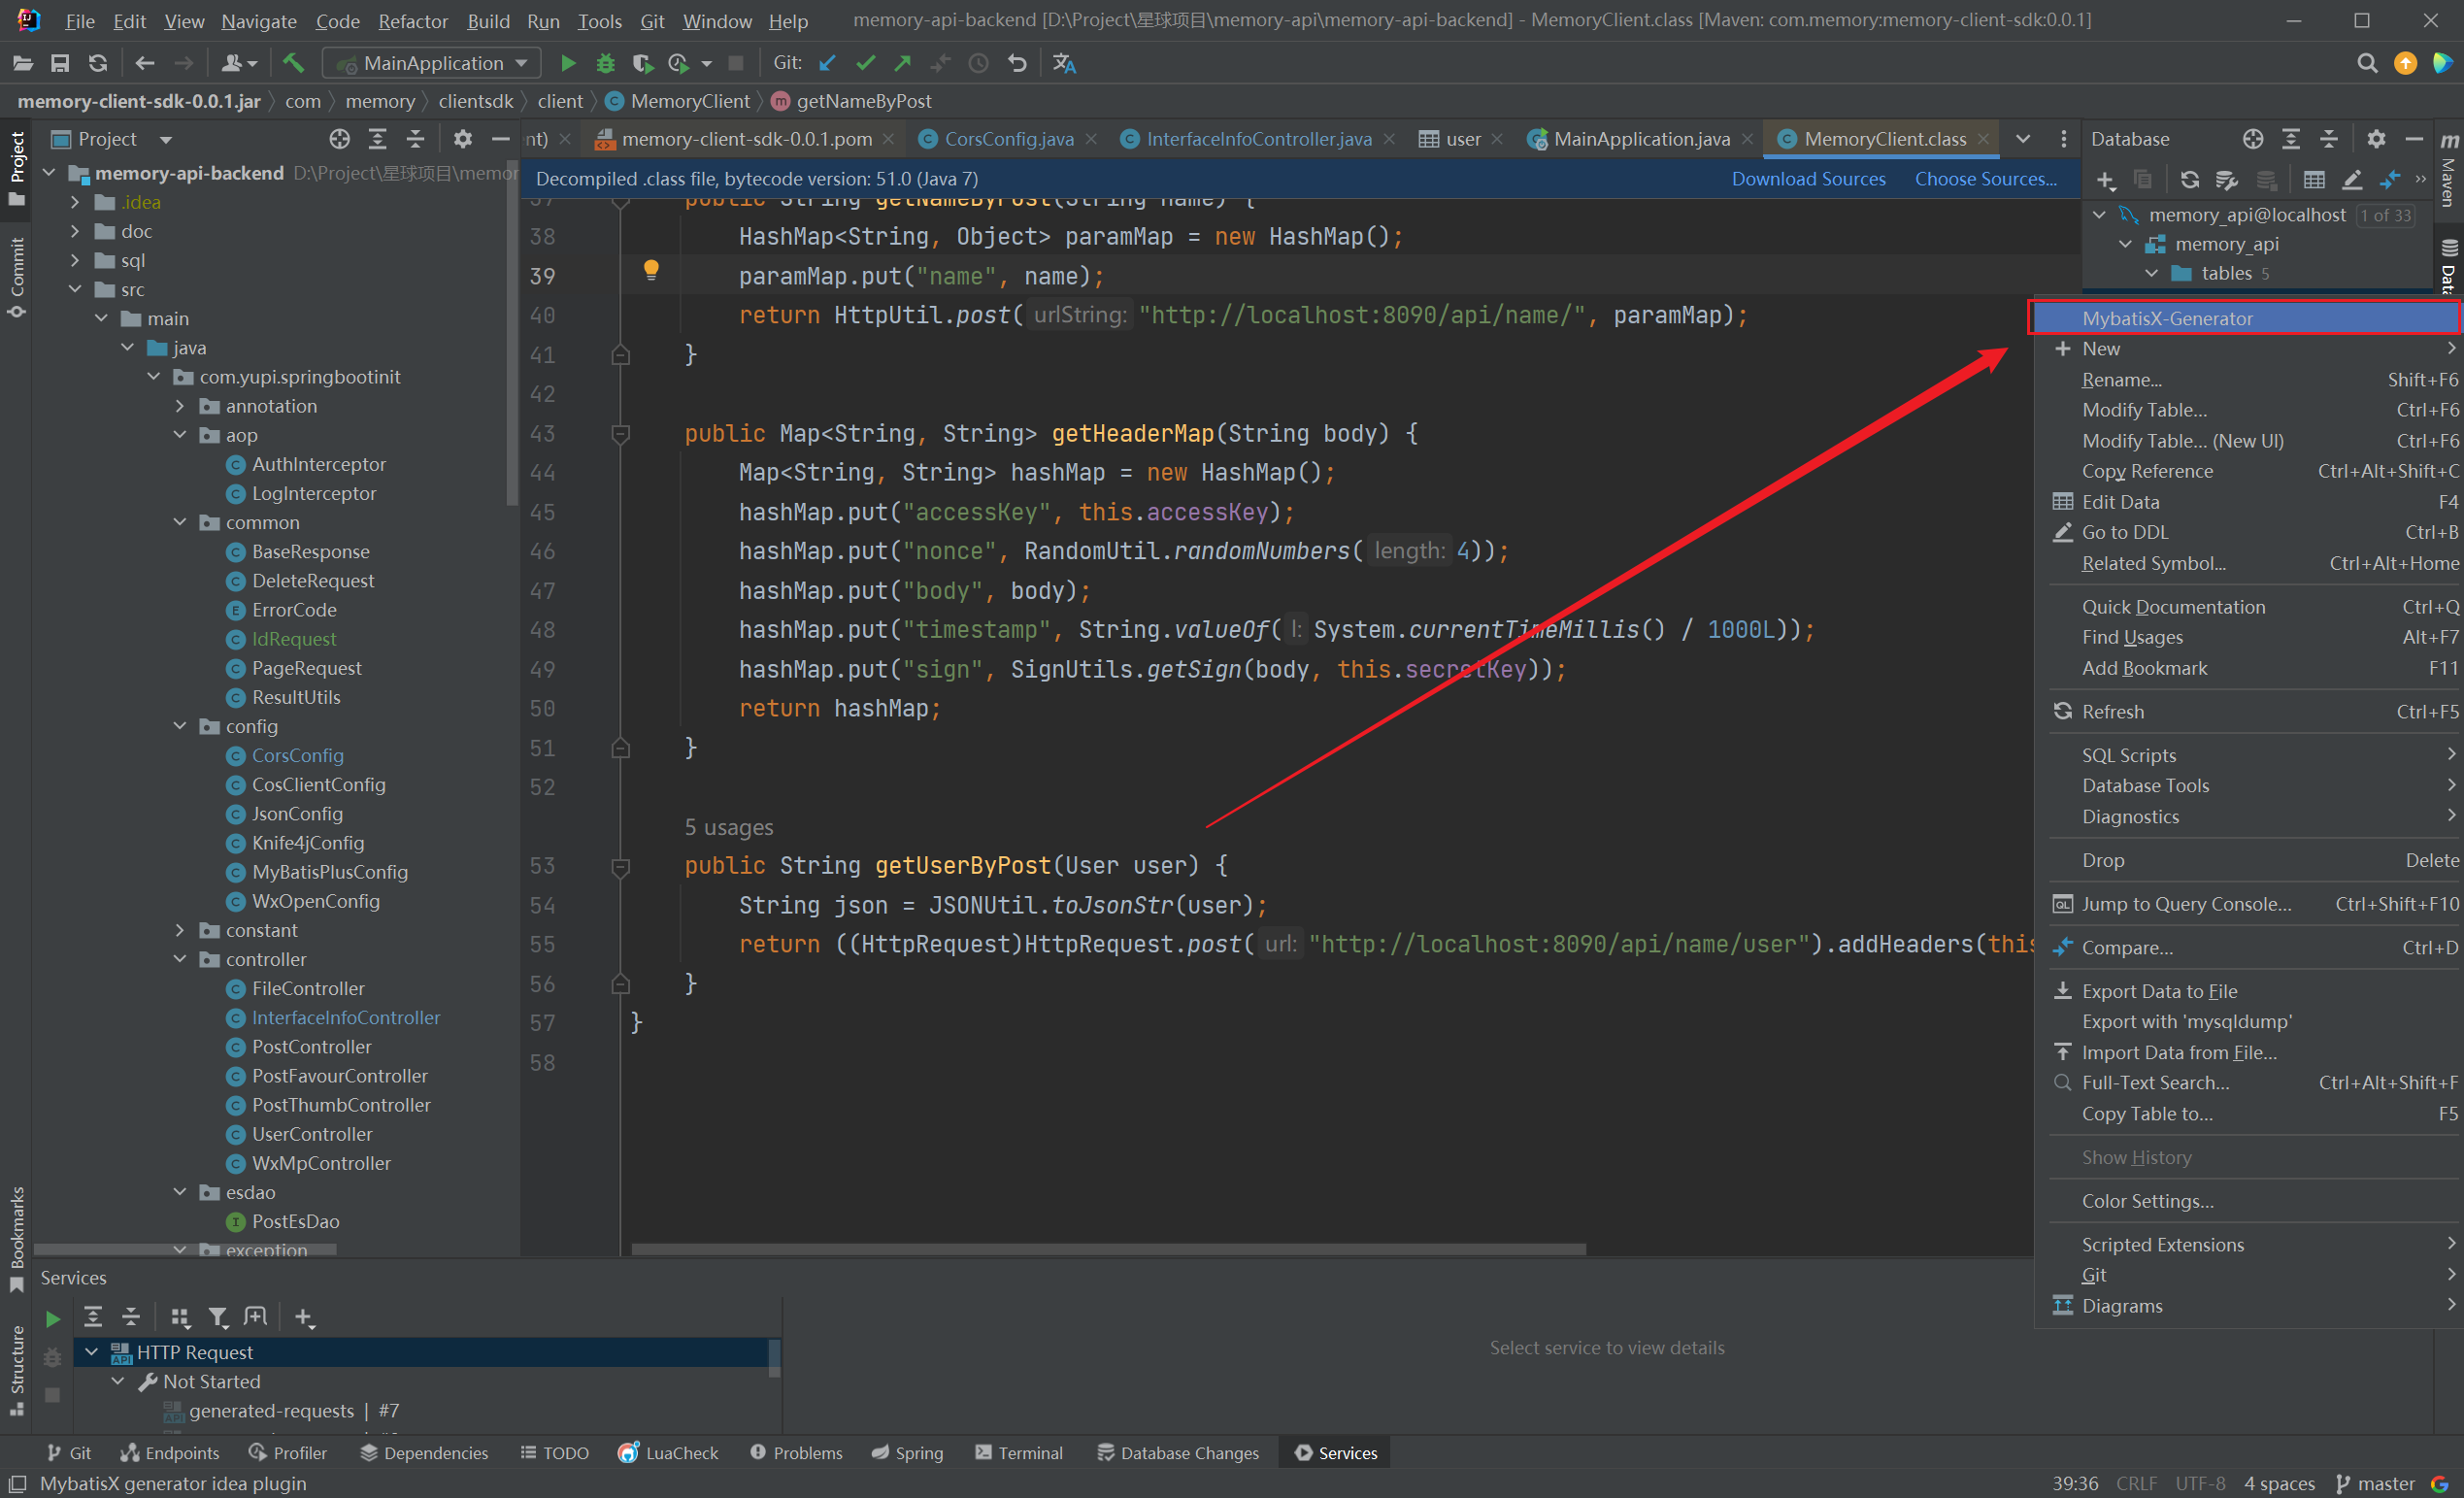
MybatisX-Genetator
MybatisX-Genetator:代码自动生成器
连接到数据库后,在一个表右键菜单点击 MybatisX-Genetator:(2023/08/20晚)
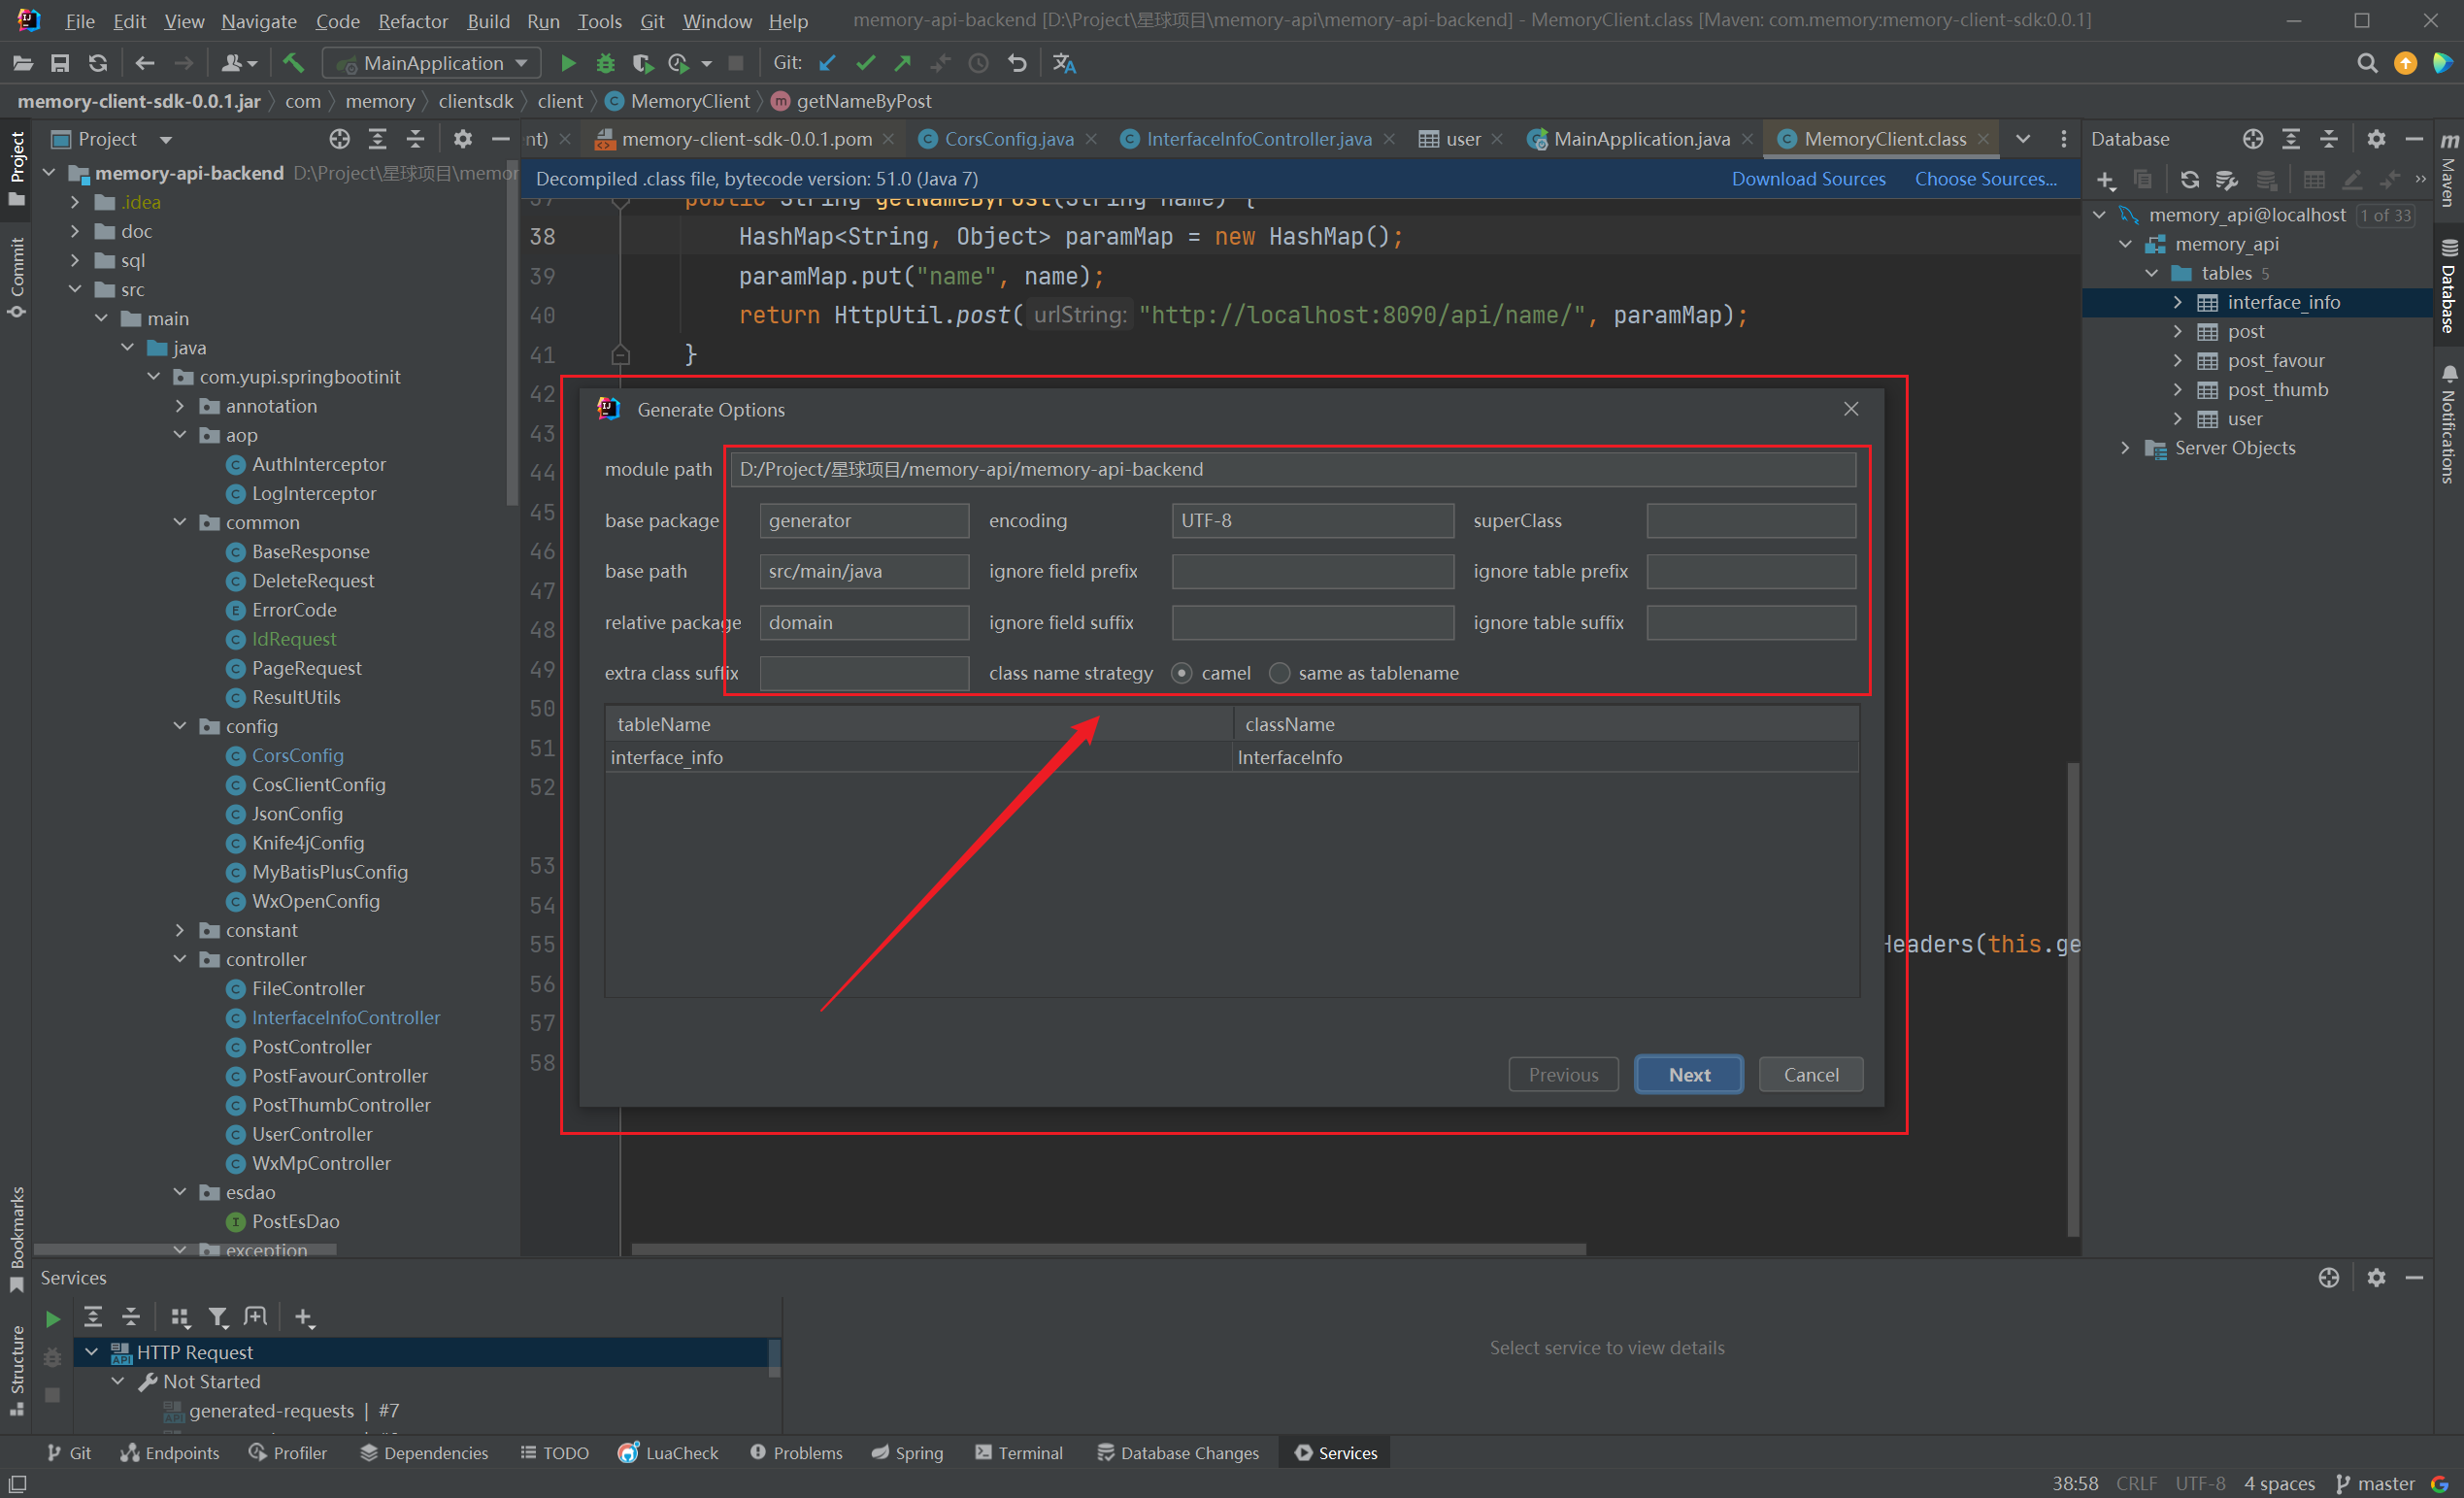
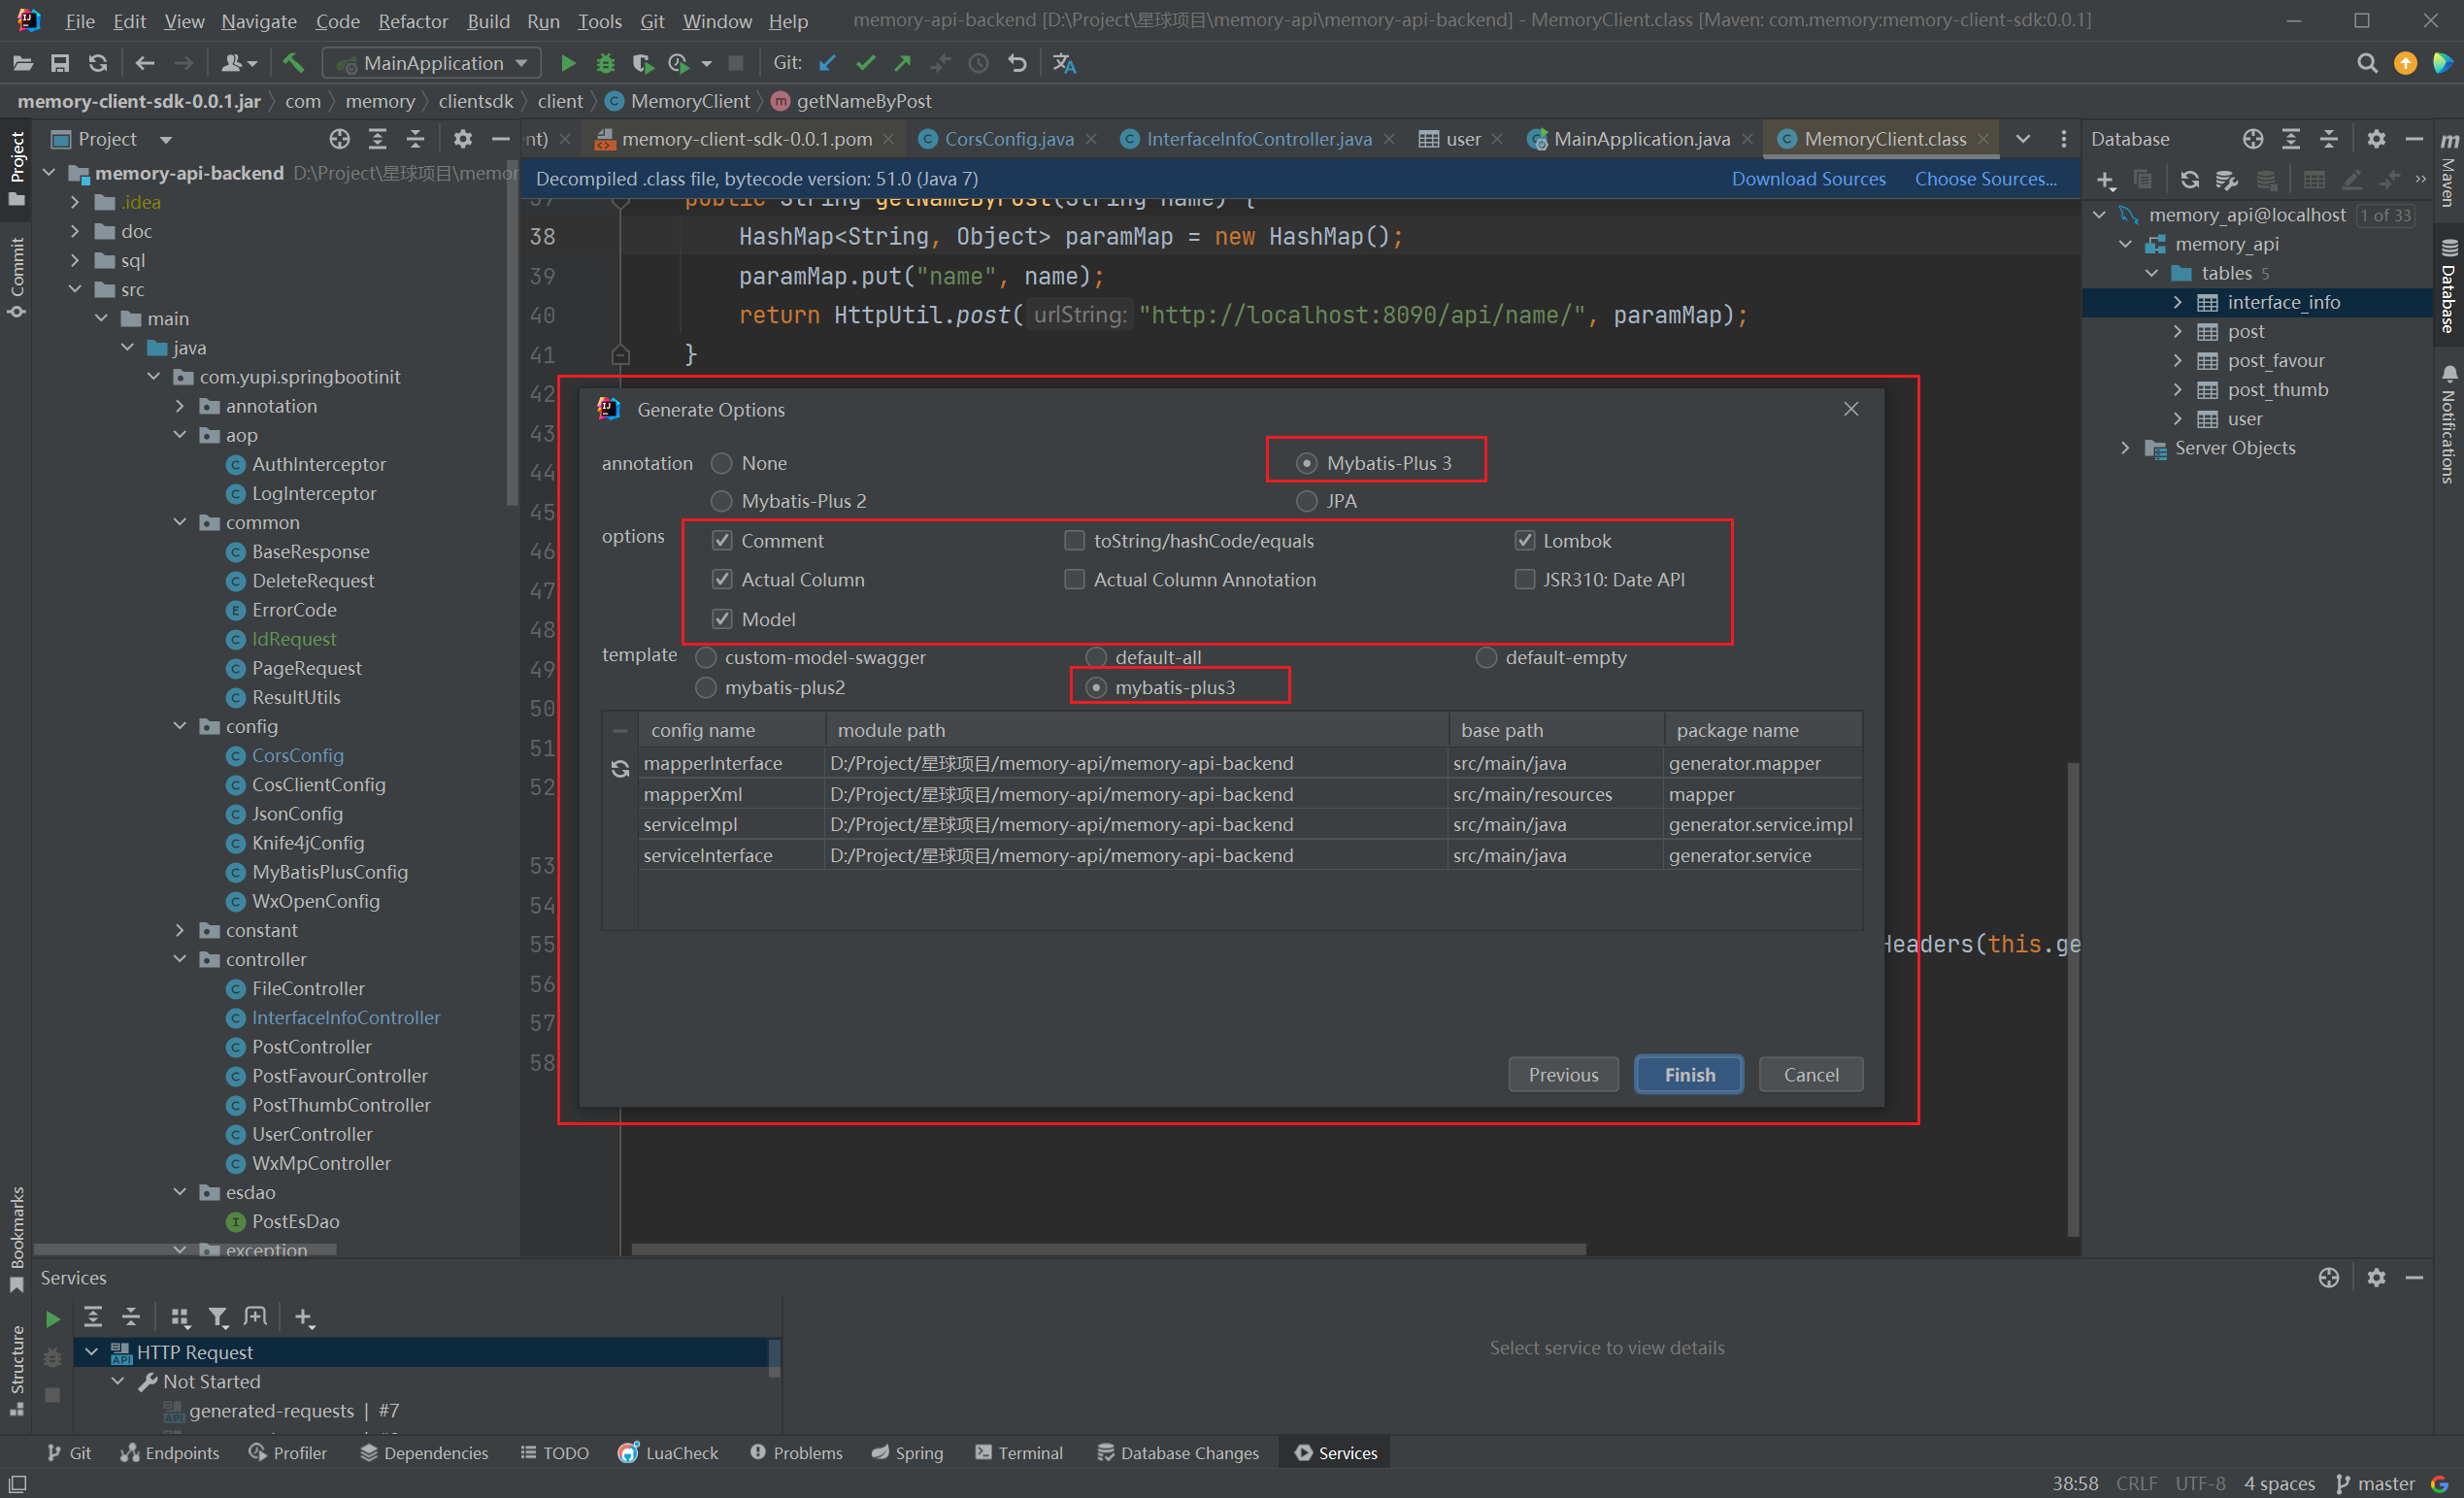
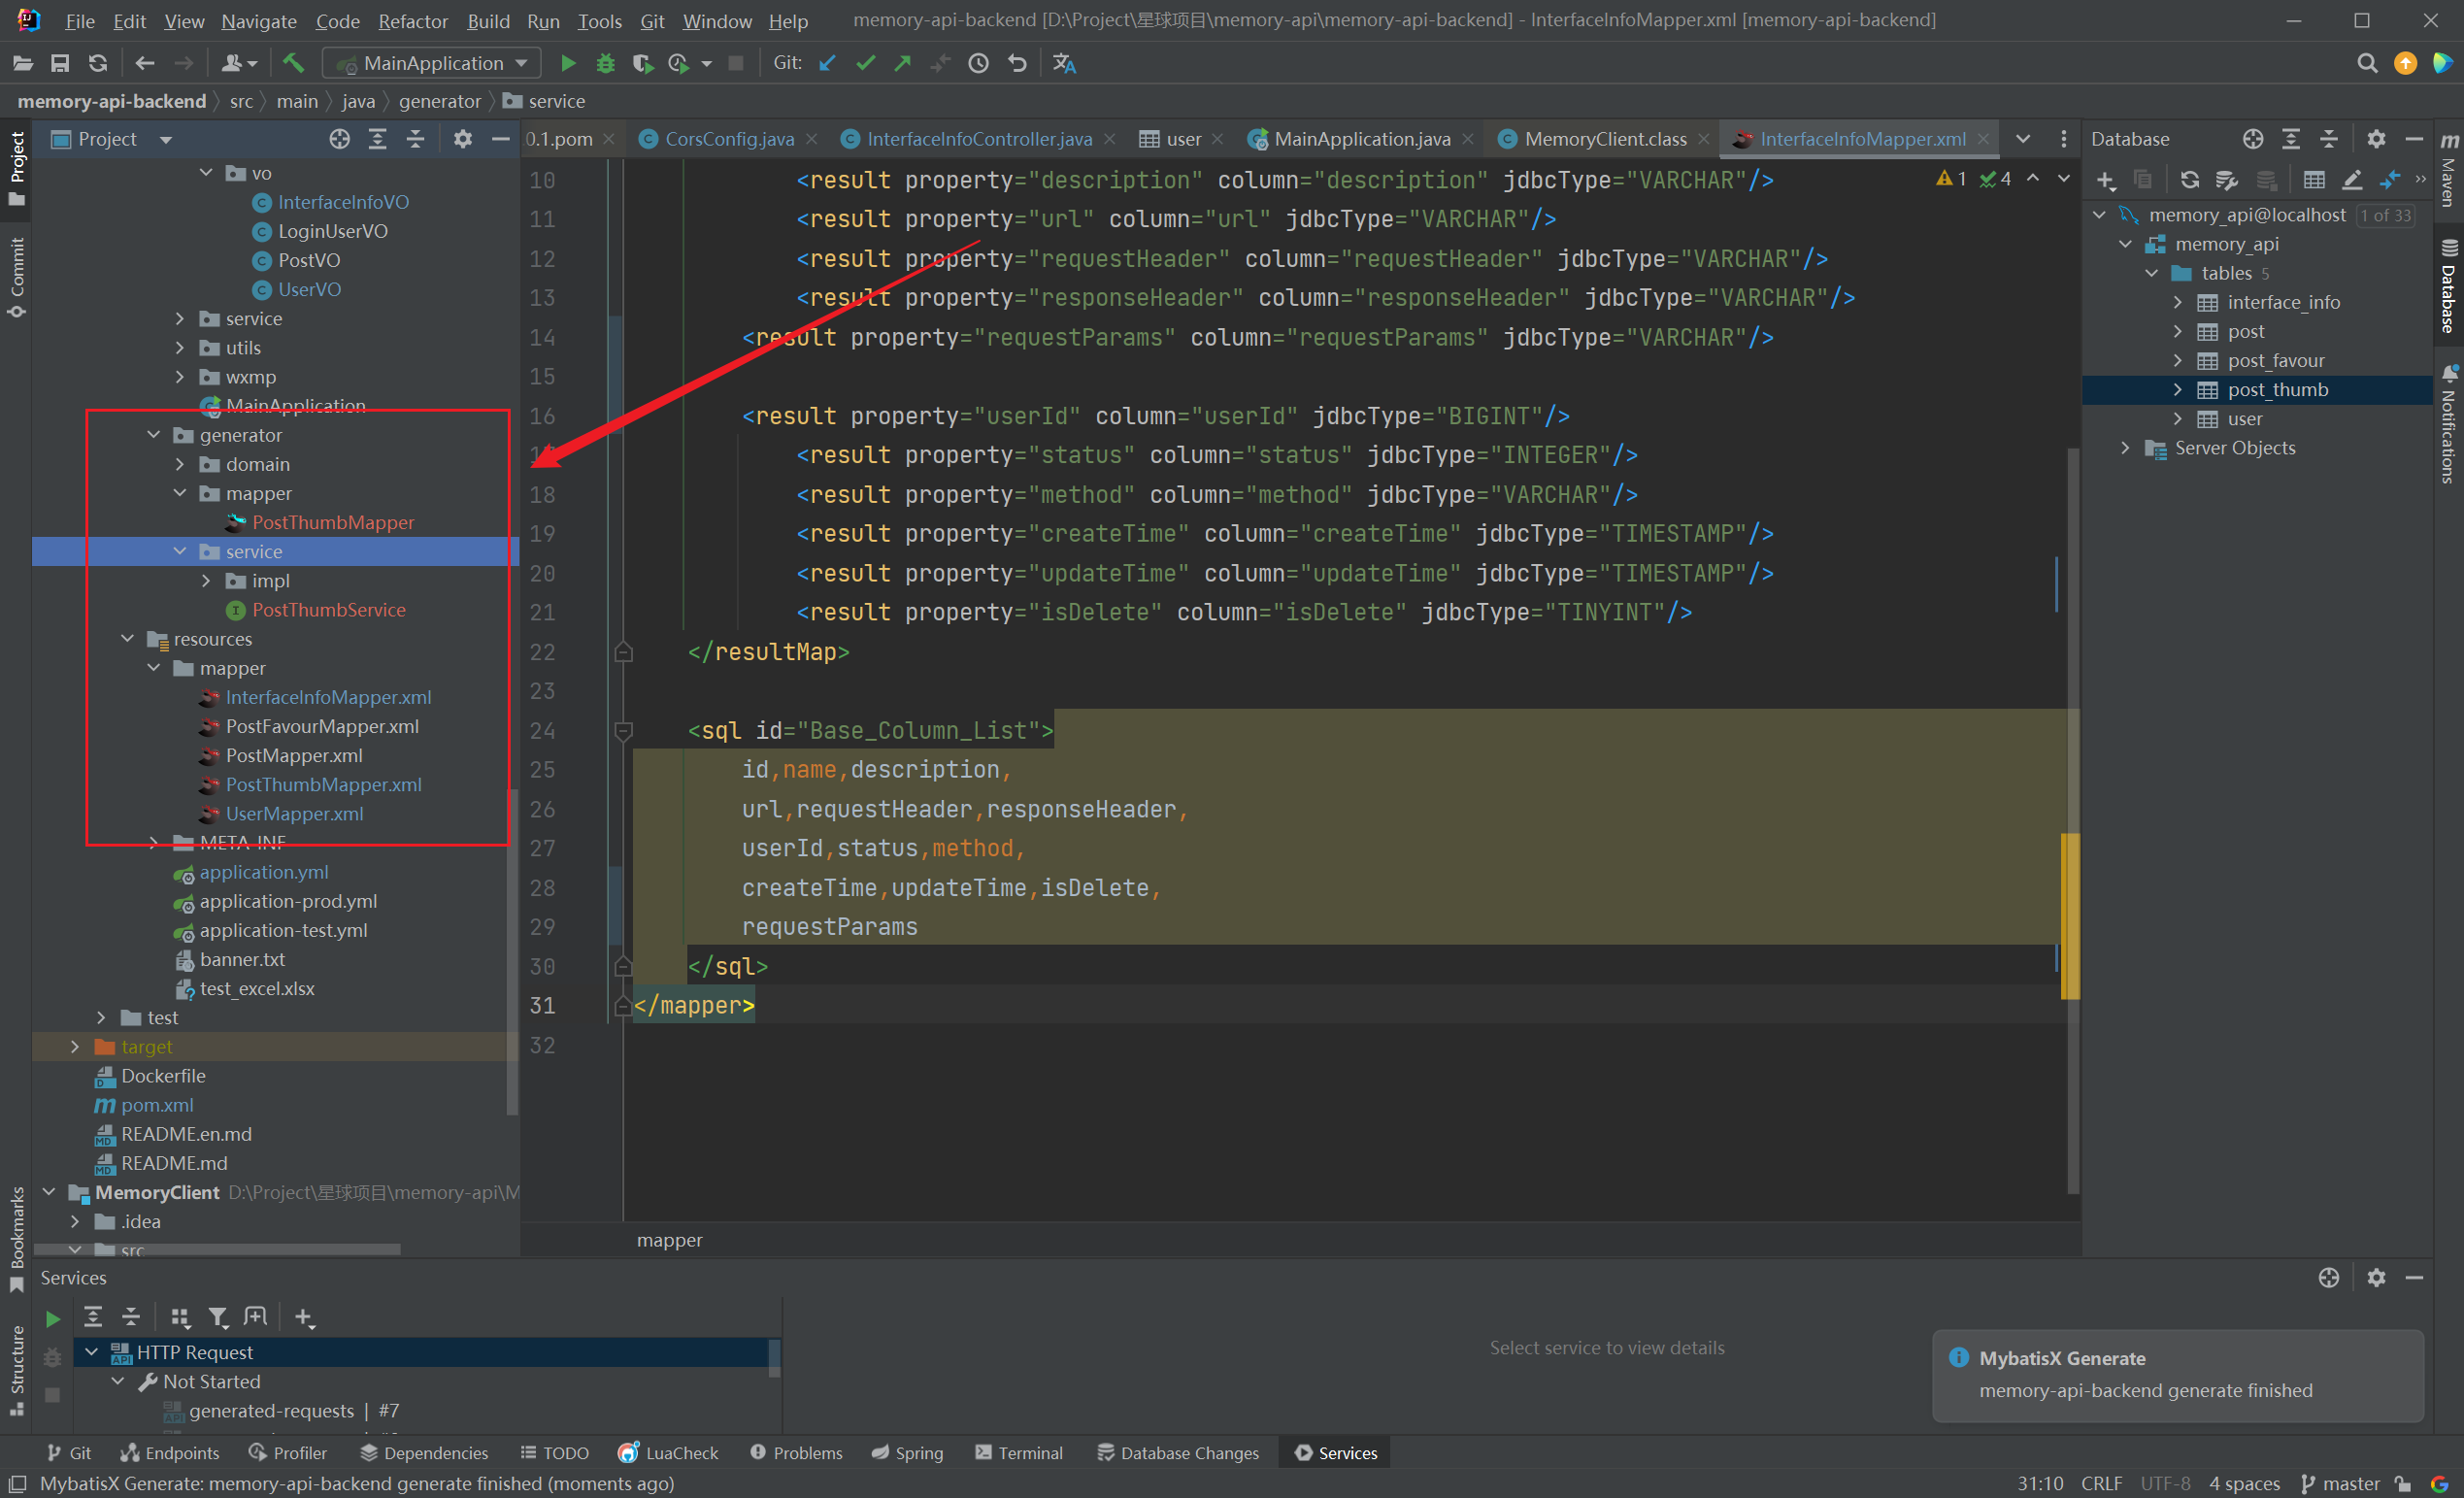
点击Finish,直接生成domain、service、serviceImpl、mapper、mapperXml:
GenerateAllSetter
- 这是一款快速生成对象的 getter、setter方法的插件,对日常的代码开发很有帮助 (2023/10/05晚)

- 我们定义一个 User 对象,右键,即可快速生成该对象的 geeter、setter 方法:

- 我在开发项目的过程中,转换 entity 为 对应 VO 对象时,使用该插件居多:(2023/10/05晚)
1
2
3
4
5
6
7
8
9
10
11
12
13
14
15
16
17
18
19
20
21
22
23
24
25
26
27
28
29
|
public List<TeamVO> getTeamVOByTeam(List<Team> teamList) {
return teamList.stream().map(team -> {
Long userId = team.getUserId();
String userName = userService.getById(userId).getUsername();
TeamVO teamVO = new TeamVO();
teamVO.setId(team.getId());
teamVO.setName(team.getName());
teamVO.setDescription(team.getDescription());
teamVO.setMaxNum(team.getMaxNum());
teamVO.setUserName(userName);
teamVO.setImgUrl(team.getImgUrl());
teamVO.setJoinNum(team.getJoinNum());
teamVO.setStatus(team.getStatus());
teamVO.setExpireTime(team.getExpireTime());
teamVO.setCreateTime(team.getCreateTime());
teamVO.setUpdateTime(team.getUpdateTime());
teamVO.setIsDelete(team.getIsDelete());
teamVO.setAnnouncement(team.getAnnouncement());
return teamVO;
}).collect(Collectors.toList());
}
|
String Manipulation

可以实现快速将选定字符串转换为大写:

总结